One thing I’ve learned living abroad is that there are no perfect countries. Some may get certain things “more right” than others, but at the end of the day, there will never be a perfect country because there are no perfect people.
Still, rather than take a fatalistic view of the whole thing, I prefer to do what is within my own power to do: consider my own contribution to it all. And, in addition to my personal responsibility to respect each person I come in contact with, I choose to pray.
God said, “if My people who are called by My name will humble themselves, and pray and seek My face… I will heal their land.” (2 Chron. 7:14 NKJV)
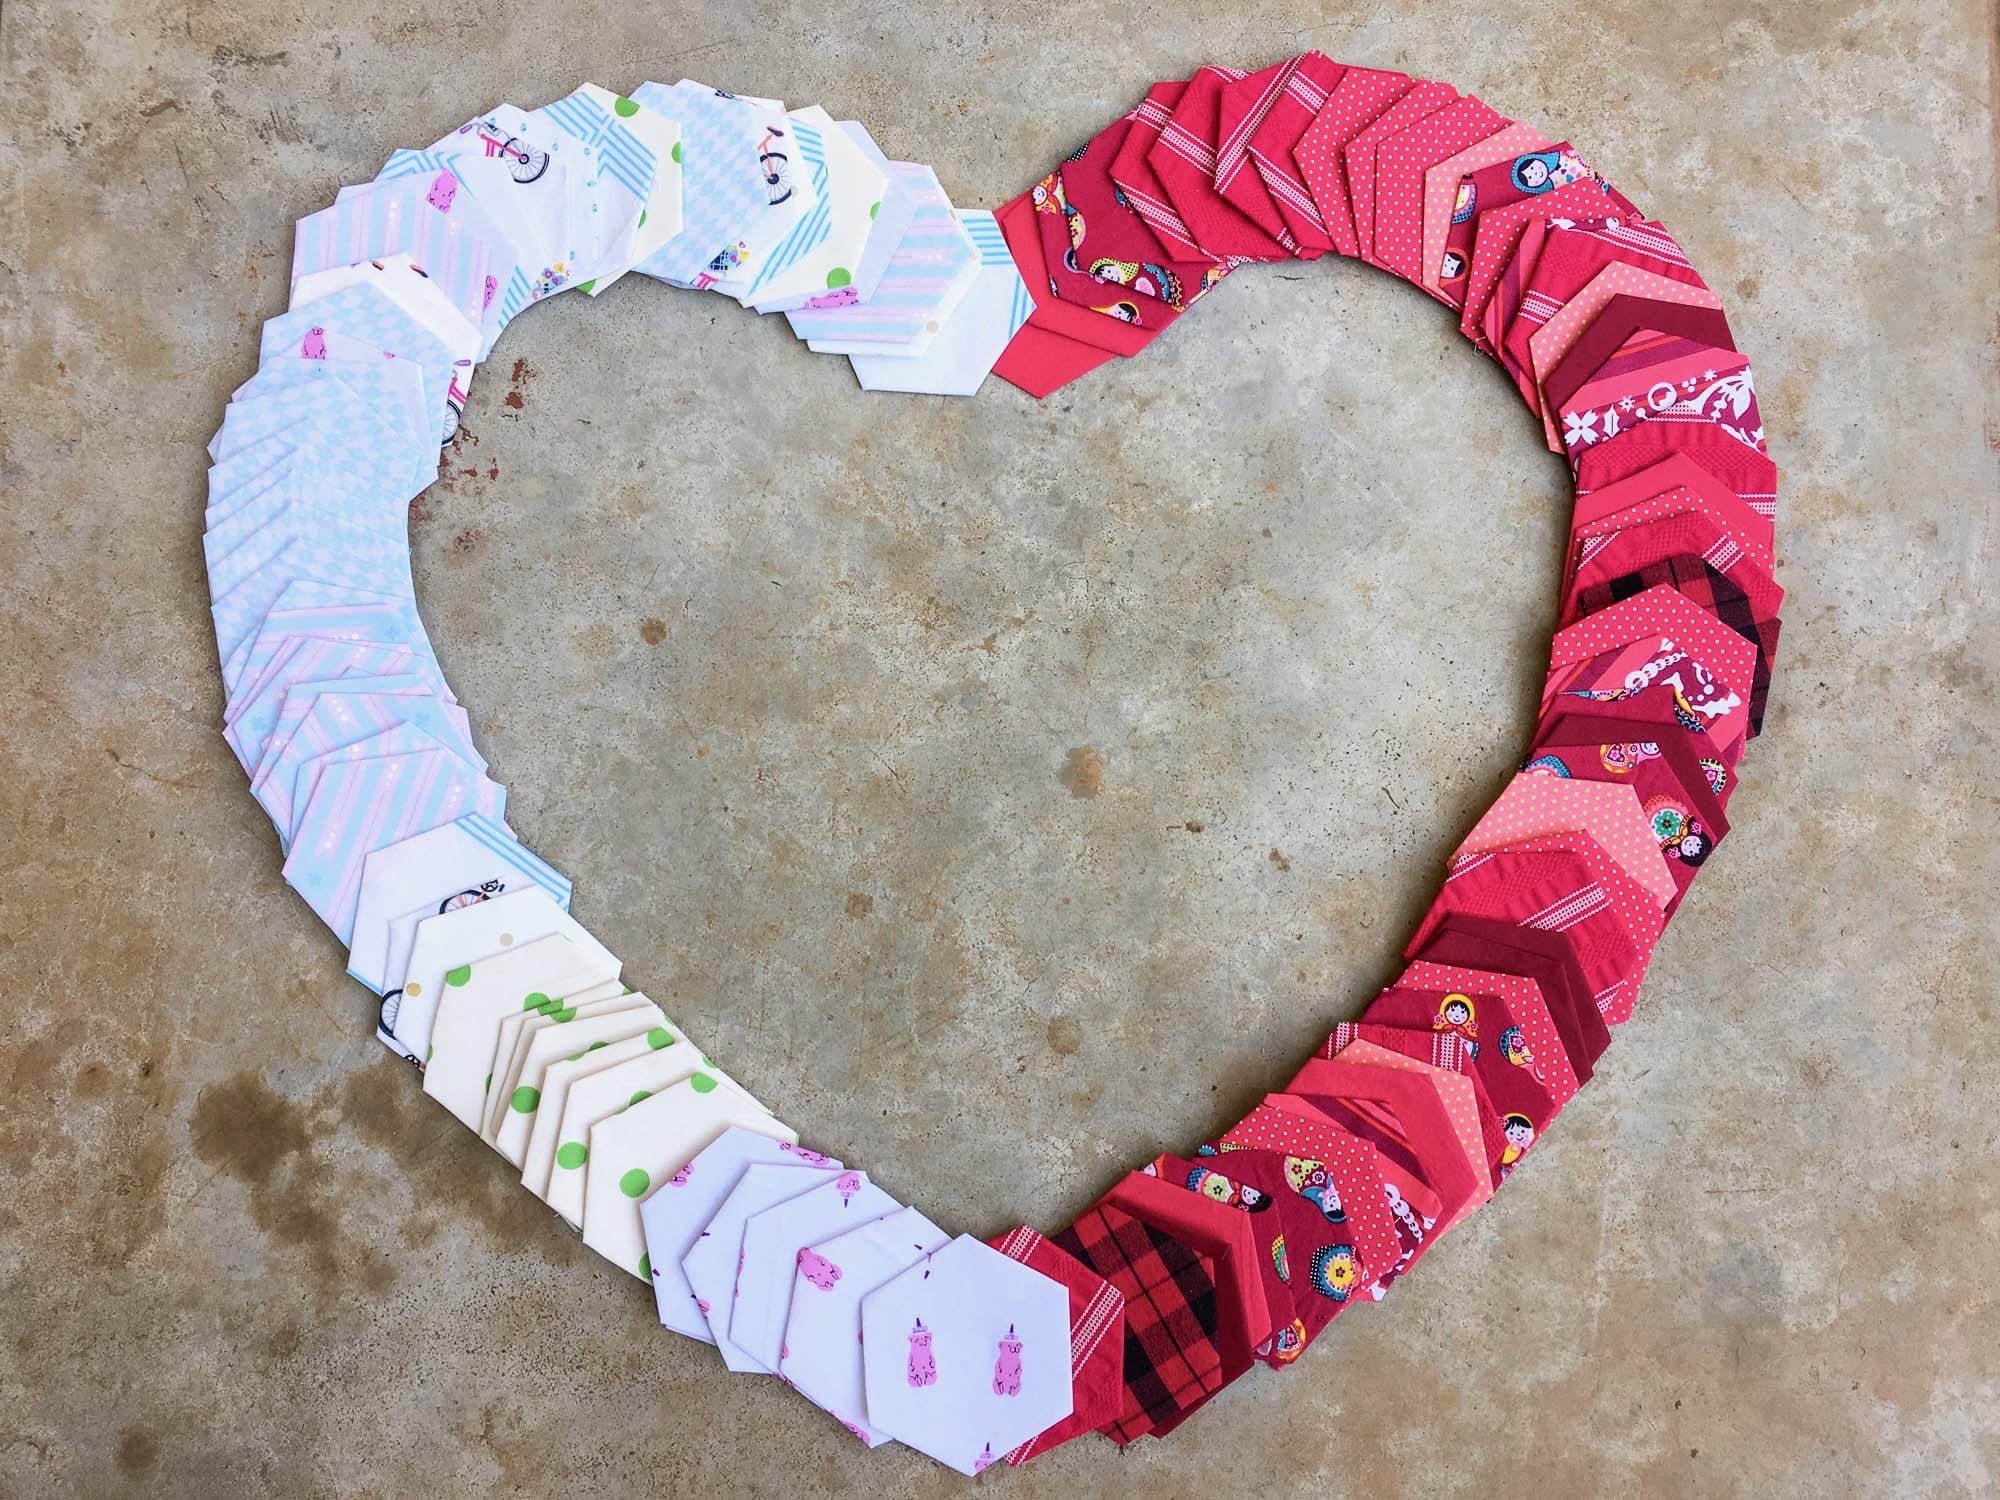
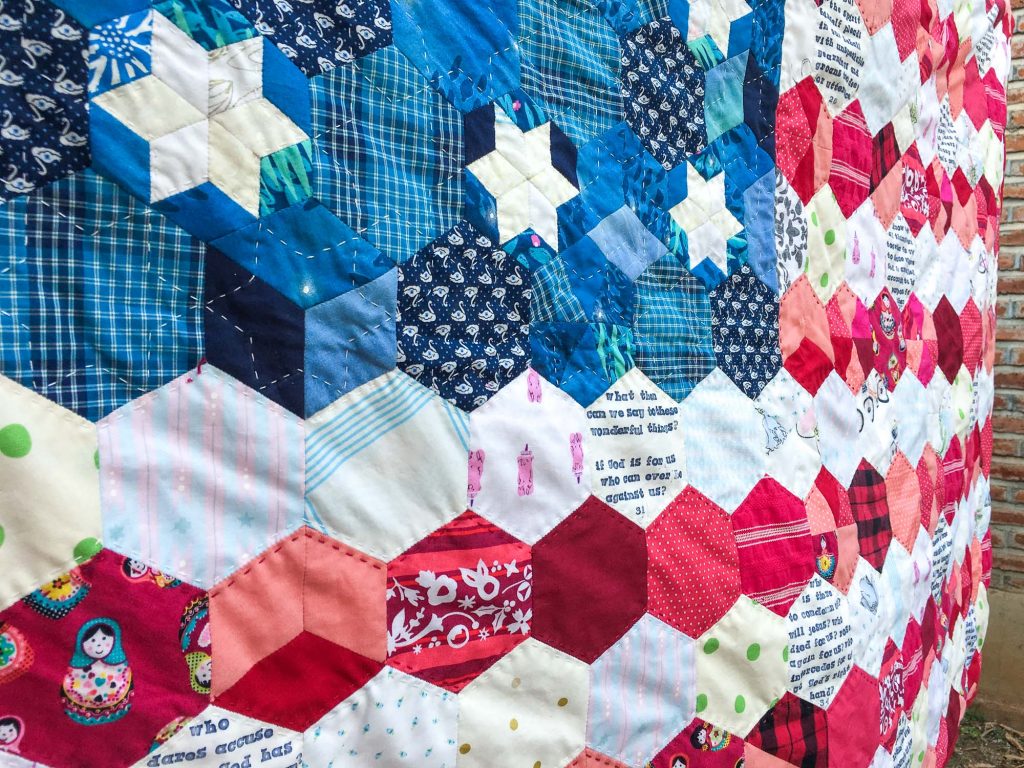
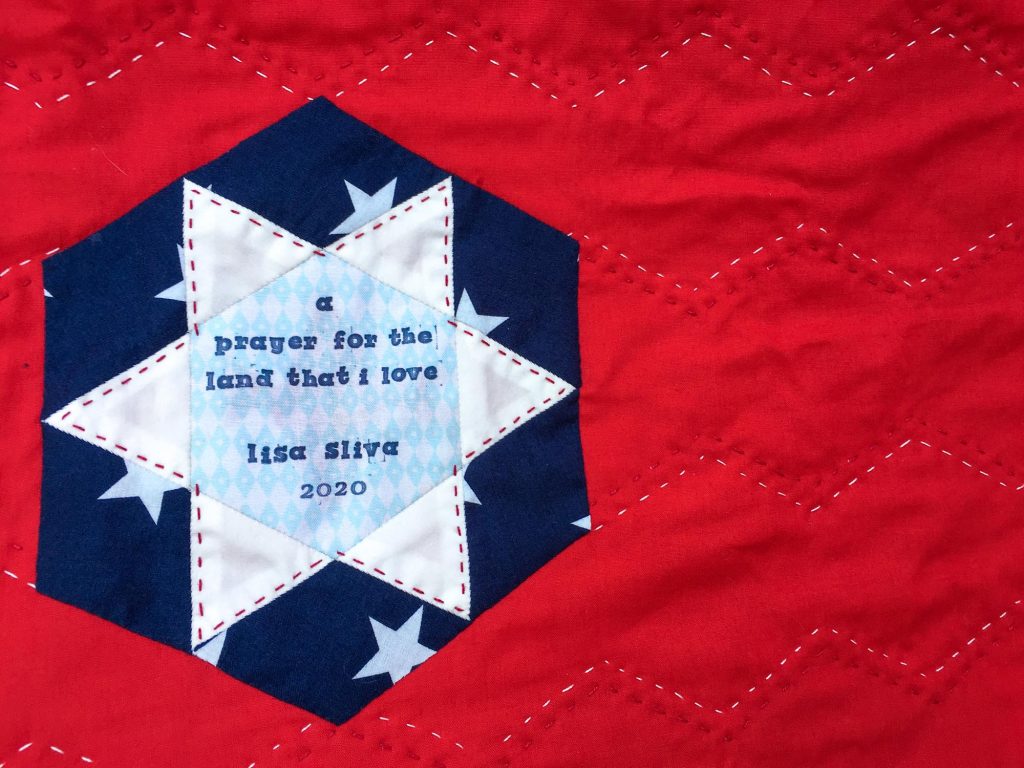
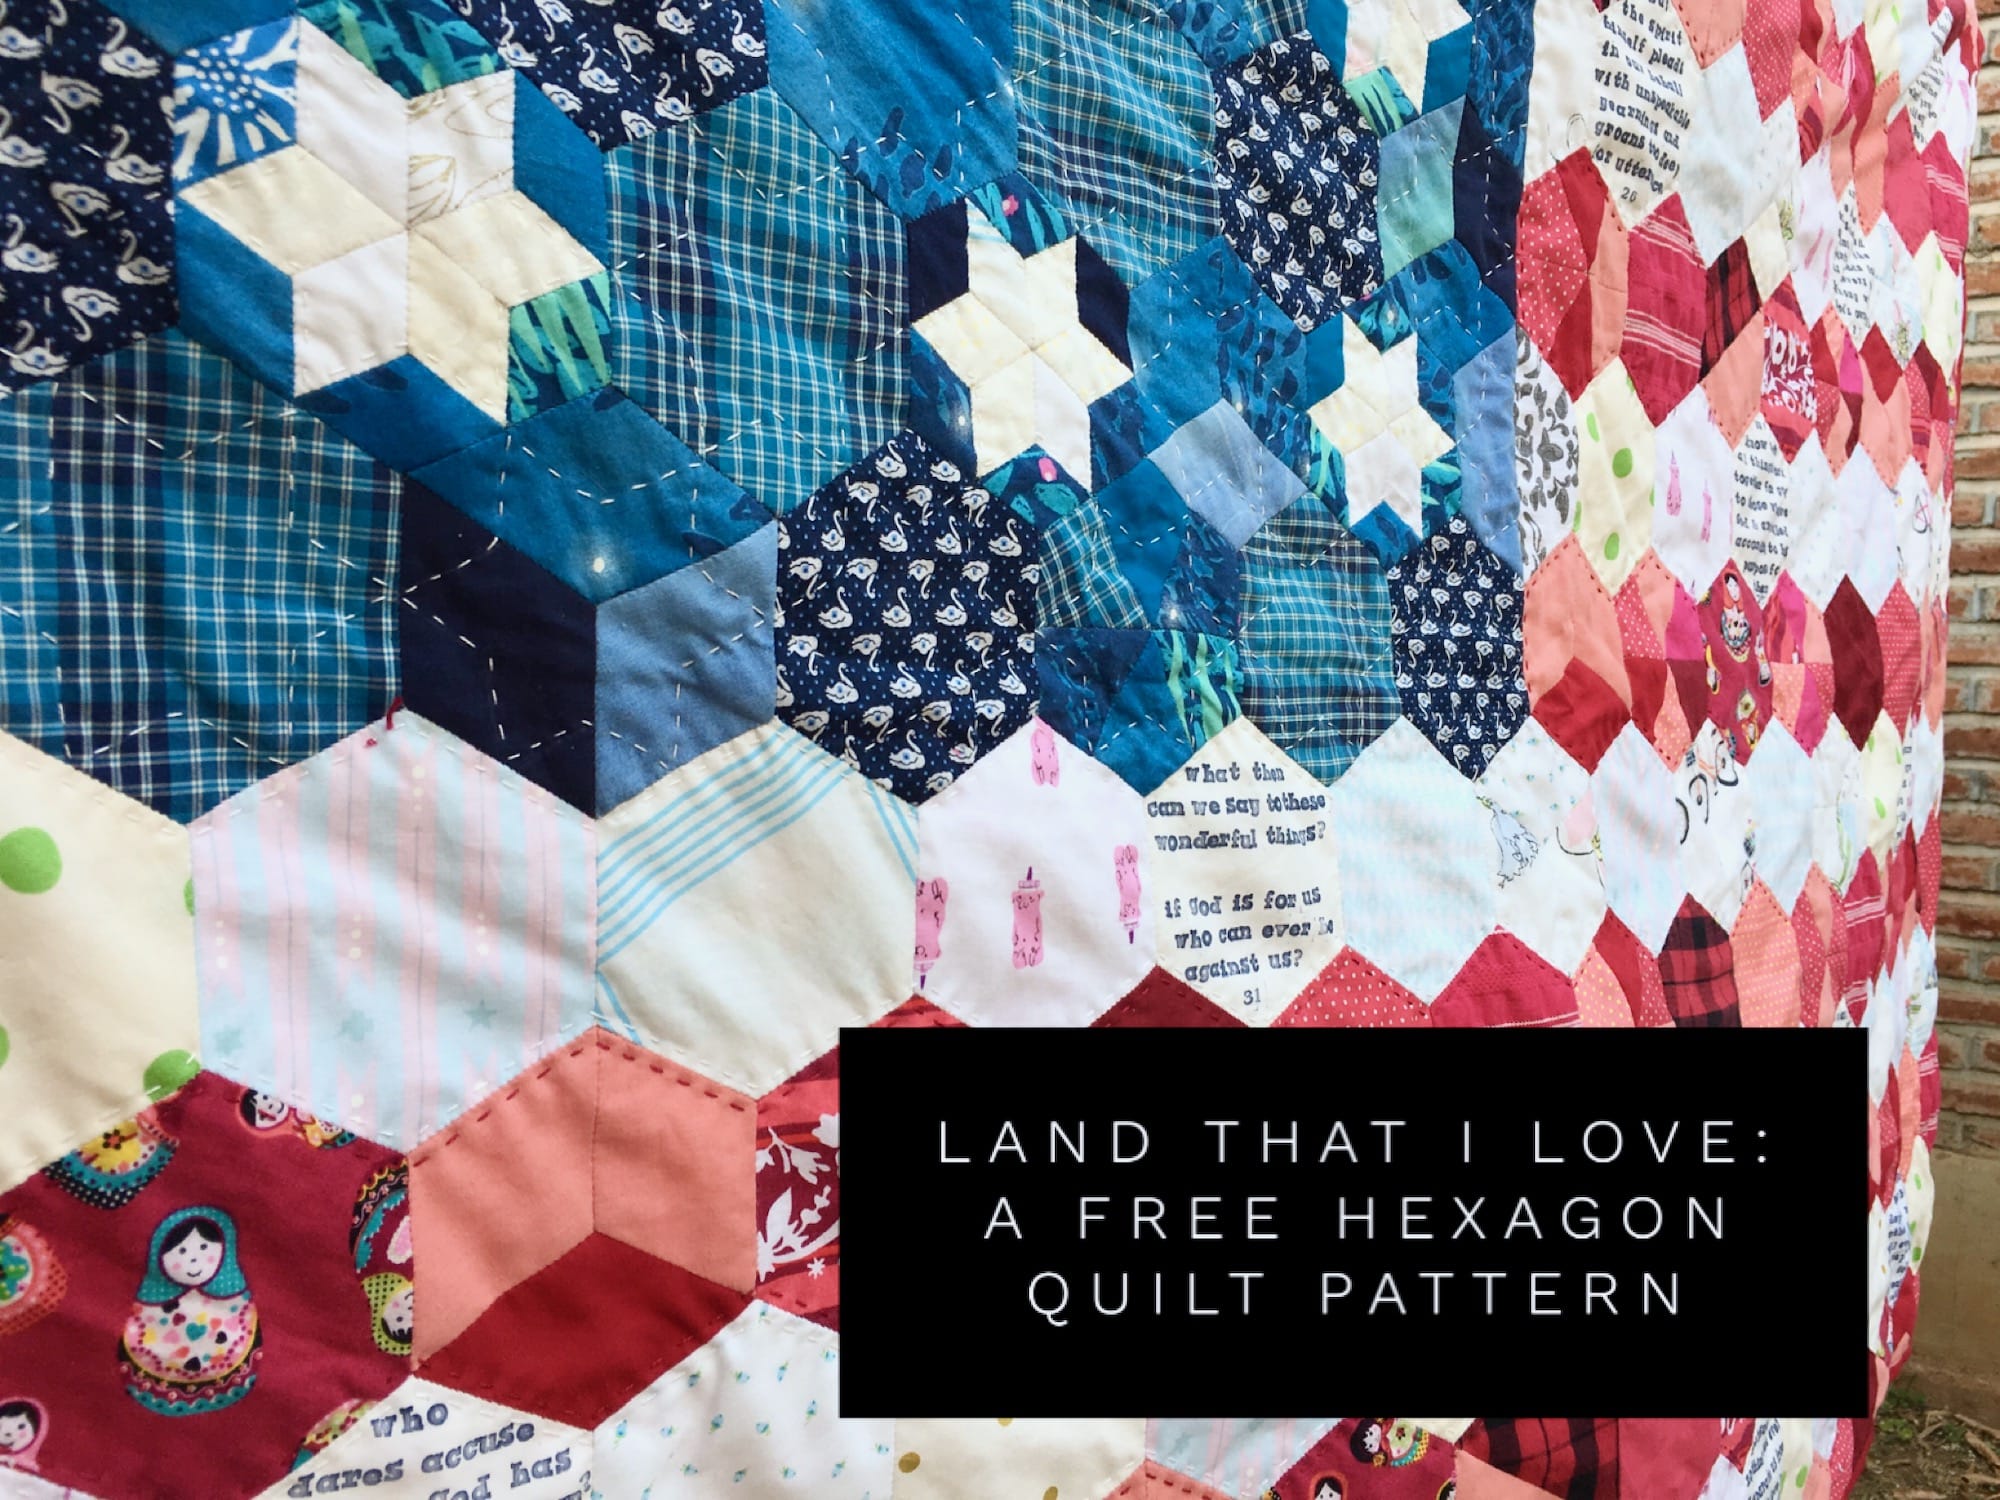
So this quilt is a prayer. It’s a prayer for unity and healing and growth.
I know this quilt is not for everyone. No quilt is right for everyone. And, if it’s not right for you, I understand. It’s also simply a quilt made of hexagons with a blank coloring page to fill in as you choose. The hexagon templates are free to all, as is the pattern.
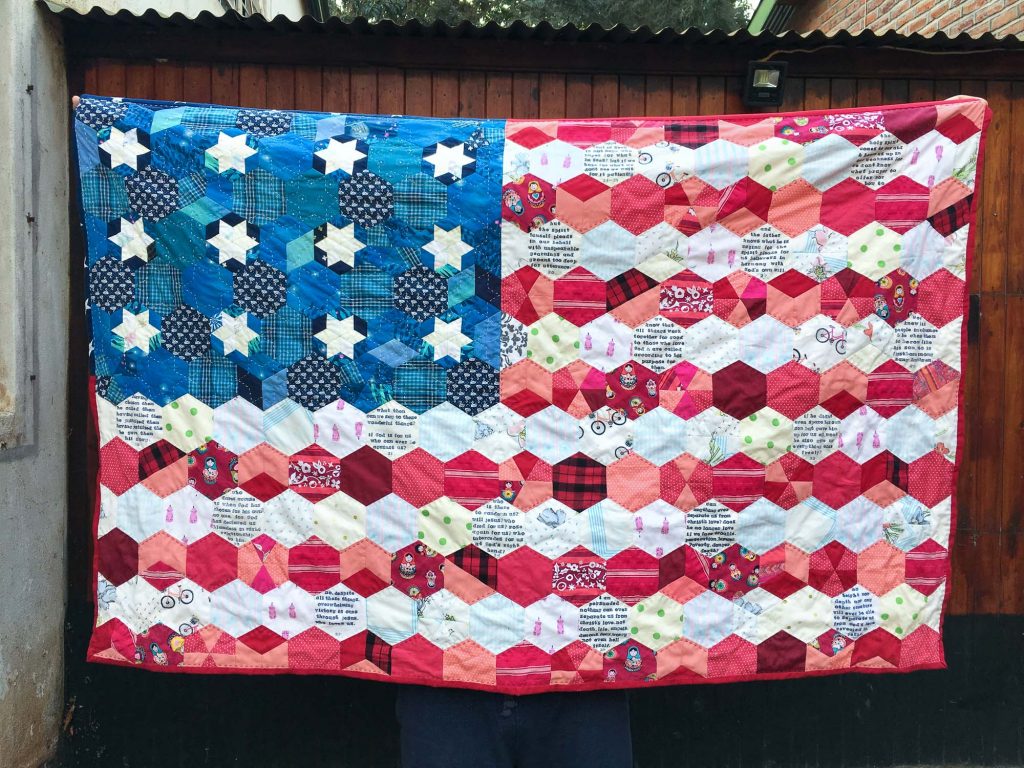
And, despite its flaws, this pattern represents an idea of freedom that has been held as an ideal for centuries, whether that ideal has been met or not. So flaws and all, this quilt is a prayer for the land that I love. And, a proclamation of quiet gratitude for those who have given their lives in service for it.
The Pattern
It is my joy and delight to share this pattern freely with you. As with all of my patterns, this one assumes a basic knowledge of English paper piecing (EPP) before beginning.
Fortunately, I have created an extensive tutorial library for both beginners (the EPP Primer) as well as experienced stitchers looking to hone their EPP skills (the EPP Pro series). If you need a refresher, feel free to browse those tutorials before you begin.
However, I have endeavored to reference specific tutorials whenever relevant throughout the pattern to provide further guidance, if needed. Regardless of your previous experience, I recommend reading all instructions before beginning.
Supplies
One little note before we dive in. You may notice that my version of this quilt contains scrappy 2” hexagons that I broke down into even smaller paper pieces to really bust my scrap stash. I have chosen not to include fabric or paper piece requirements for this in order to keep things simple.
However, feel free to print out the 2” whole hexagons and have some fun chopping them up into smaller pieces such as 2” diamonds, 1” kites, or 2” triangles to add a scrappier effect. Just make sure that your final hexagons measure 2” along each side, and you’re good to go!
Paper Pieces
Feel free to reuse your own paper pieces if you have them, or order them from your favorite paper pieces supplier (my favorite is Jodi Godfrey of Tales of Cloth). However, I have provided a FREE printable set of paper pieces you can download here.
In the printable version, you will notice that the 2” hexagons are laid out for easy cutting using a rotary cutter and cutting mat. This method is my favorite way to quickly and efficiently cut lots of paper pieces in a short period of time. (You can find my post demonstrating that method here. It’s EPP hack number 2.) The star hexagons, however, will require a bit more patience with a pair of paper scissors, but there are only a few of them.
If you choose to use the printable templates I have provided, I have indicated the number of pages you need to print if you do not reuse any of the papers. I chose to work this pattern in sections, so you could certainly work one section at a time and reuse some of your papers to reduce paper usage.
Regardless of how and where you source your papers, you will need the following:
(200) 2” whole hexagons (50 pages)
(18) 2” half hexagons (3 pages)
(12) 6-point star hexagons – created using (144) 1” 60 degree diamonds (3 pages)
Additional Supplies
For a more specific list of my favorite basic EPP starter supplies, you can check out the list in this post. And, for a more exhaustive list of supplies that make EPP that much more enjoyable for me, check out this post.
Scissors (one pair for fabric, one pair for paper)
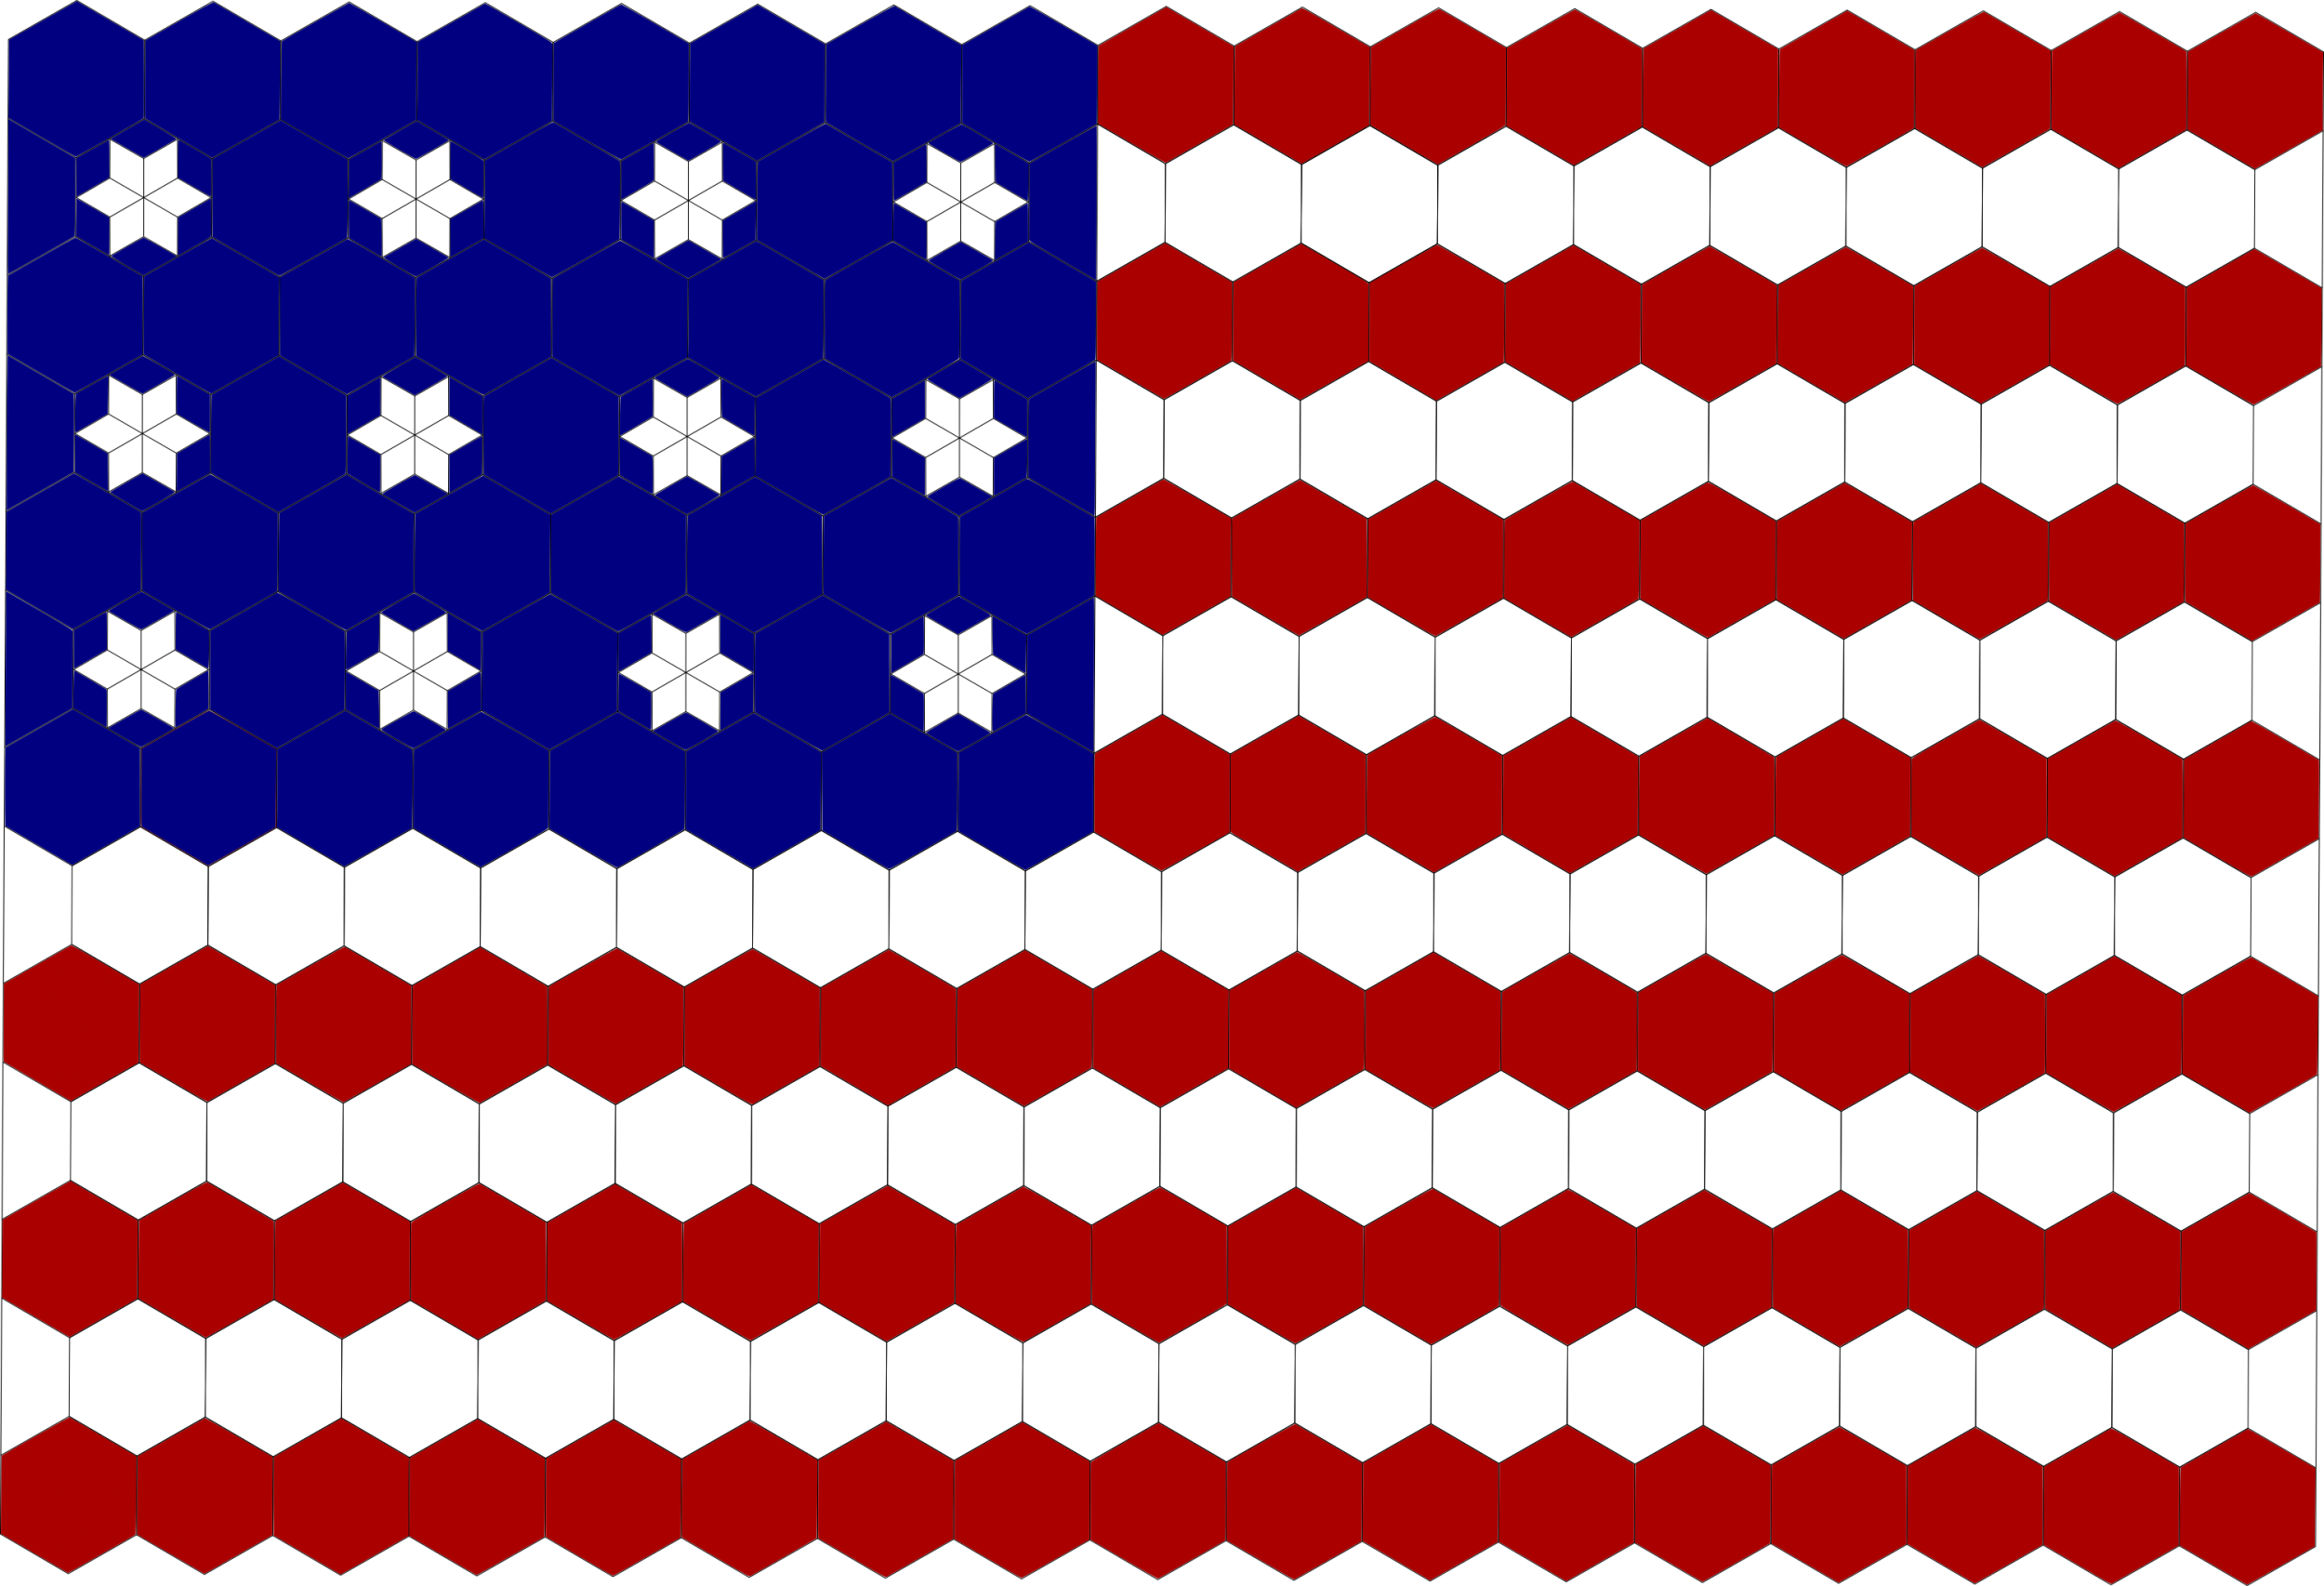
I assume that if you are creating this quilt you will likely follow the American flag adaptation I have designed. As such, the following measurements refer to the amount of fabric you will need for each corresponding color in the flag design. However, at the end of the day, this is simply a hexagon quilt and may be created using any design of your choosing. Click here for the printable coloring page.
Of Note:
Width of fabric (WOF) is assumed to be 42” and fat quarter (FQ) measurements use full 18” x 21” dimensions.
Red: 1.5 yds or 6 FQs
White: 1.5 yds or 6 FQs
Blue: 1 yd or 4 FQs
Let's break it down further:
From the above yardage, I have broken down each shape into the required fabric quantity in order to create the flag pattern. (For my favorite way to bulk baste using fabric strips as indicated below, check out my tutorial here.)
Fabric for whole hexagons:
Red:(87) 2” whole hexagons
(10) 4.5” WOF strips OR (22) 4.5”x 18” strips OR (87) 4.5” squares
White:(72) 2” whole hexagons
(8) 4.5” WOF strips OR (18) 4.5” x 18” strips OR (72) 4.5” squares
Blue:(41) 2” whole hexagons
(5) 4.5” WOF strips OR (11) 4.5” x 18” strips OR (41) 4.5” squares
Fabric for the half hexagons:
White:(12) 2” half hexagons
(2) 2.5” WOF strips OR (3) 2.5” x 18” strips OR (12) 2.5” x 4.5” scraps
Blue:(6) 2” half hexagons
(1) 2.5” WOF strips OR (2) 2.5” x 18” strips OR (6) 2.5” x 4.5” scraps
Fabric for the 6-point star hexagons which are created using 1” 60-degree diamonds:
White:(72) 1” diamonds
(4) 1.5” WOF strips OR (8) 1.5” x 18” strips OR (72) 1.5” x 2” scraps
Blue:(72) 1” diamonds
(4) 1.5” WOF strips OR (8) 1.5” x 18” strips OR (72) 1.5” x 2” scraps
Additional Fabric Requirements
Binding: 1/2 yd OR (5) 2.5” WOF strips
Batting: 46” x 68”
Backing: 4 yds (2 yds)*
*I prefer to hand quilt or machine quilt my quilts on my domestic machine. However, I know that many folks prefer to send their quilts out for quilting. As such, I have indicated the “official” backing requirements in regular type and the “live-on-the-edge” measurements in italics.
Let's get stitching!
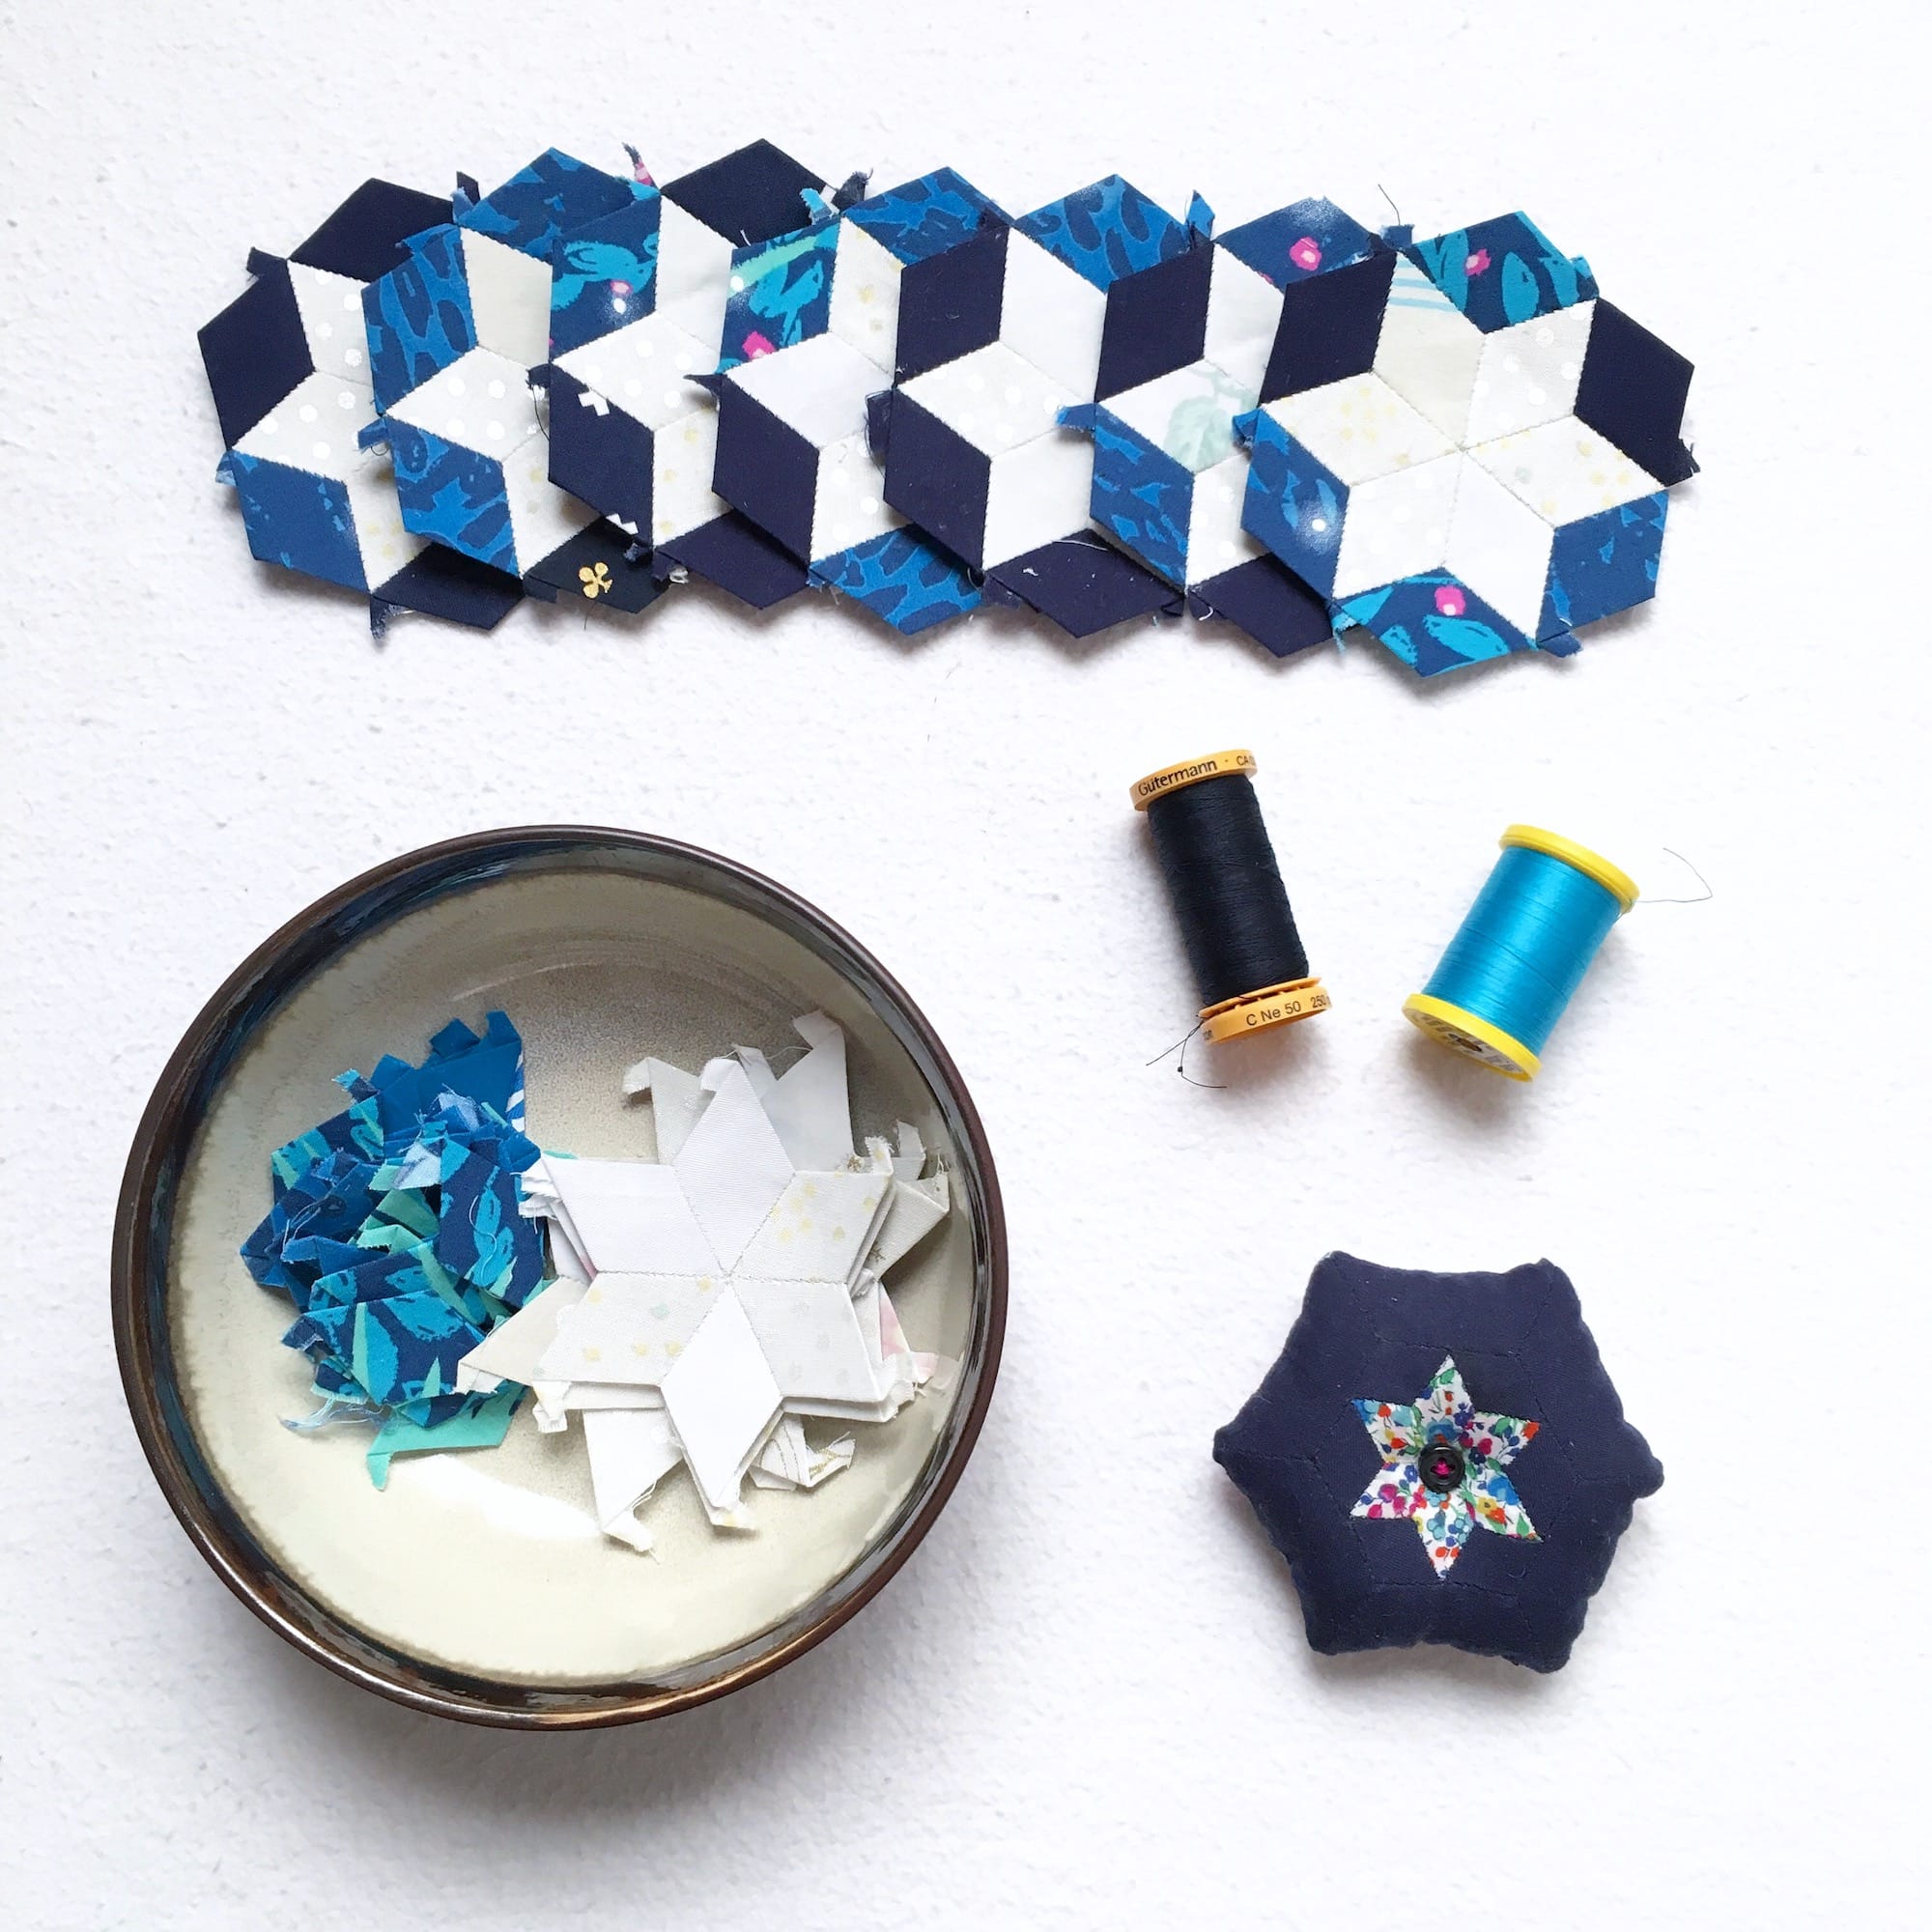
Stitching the Star Hexagon Blocks
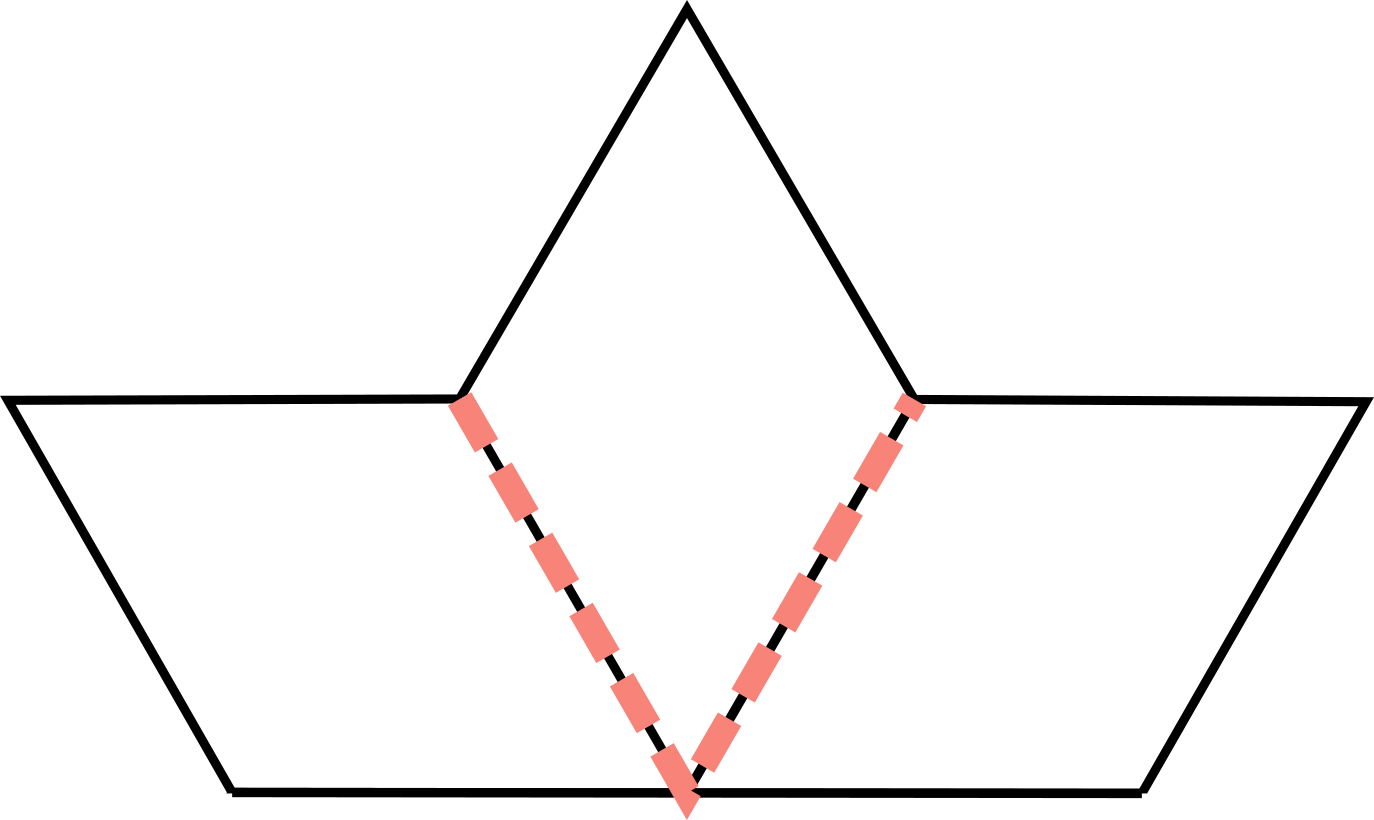
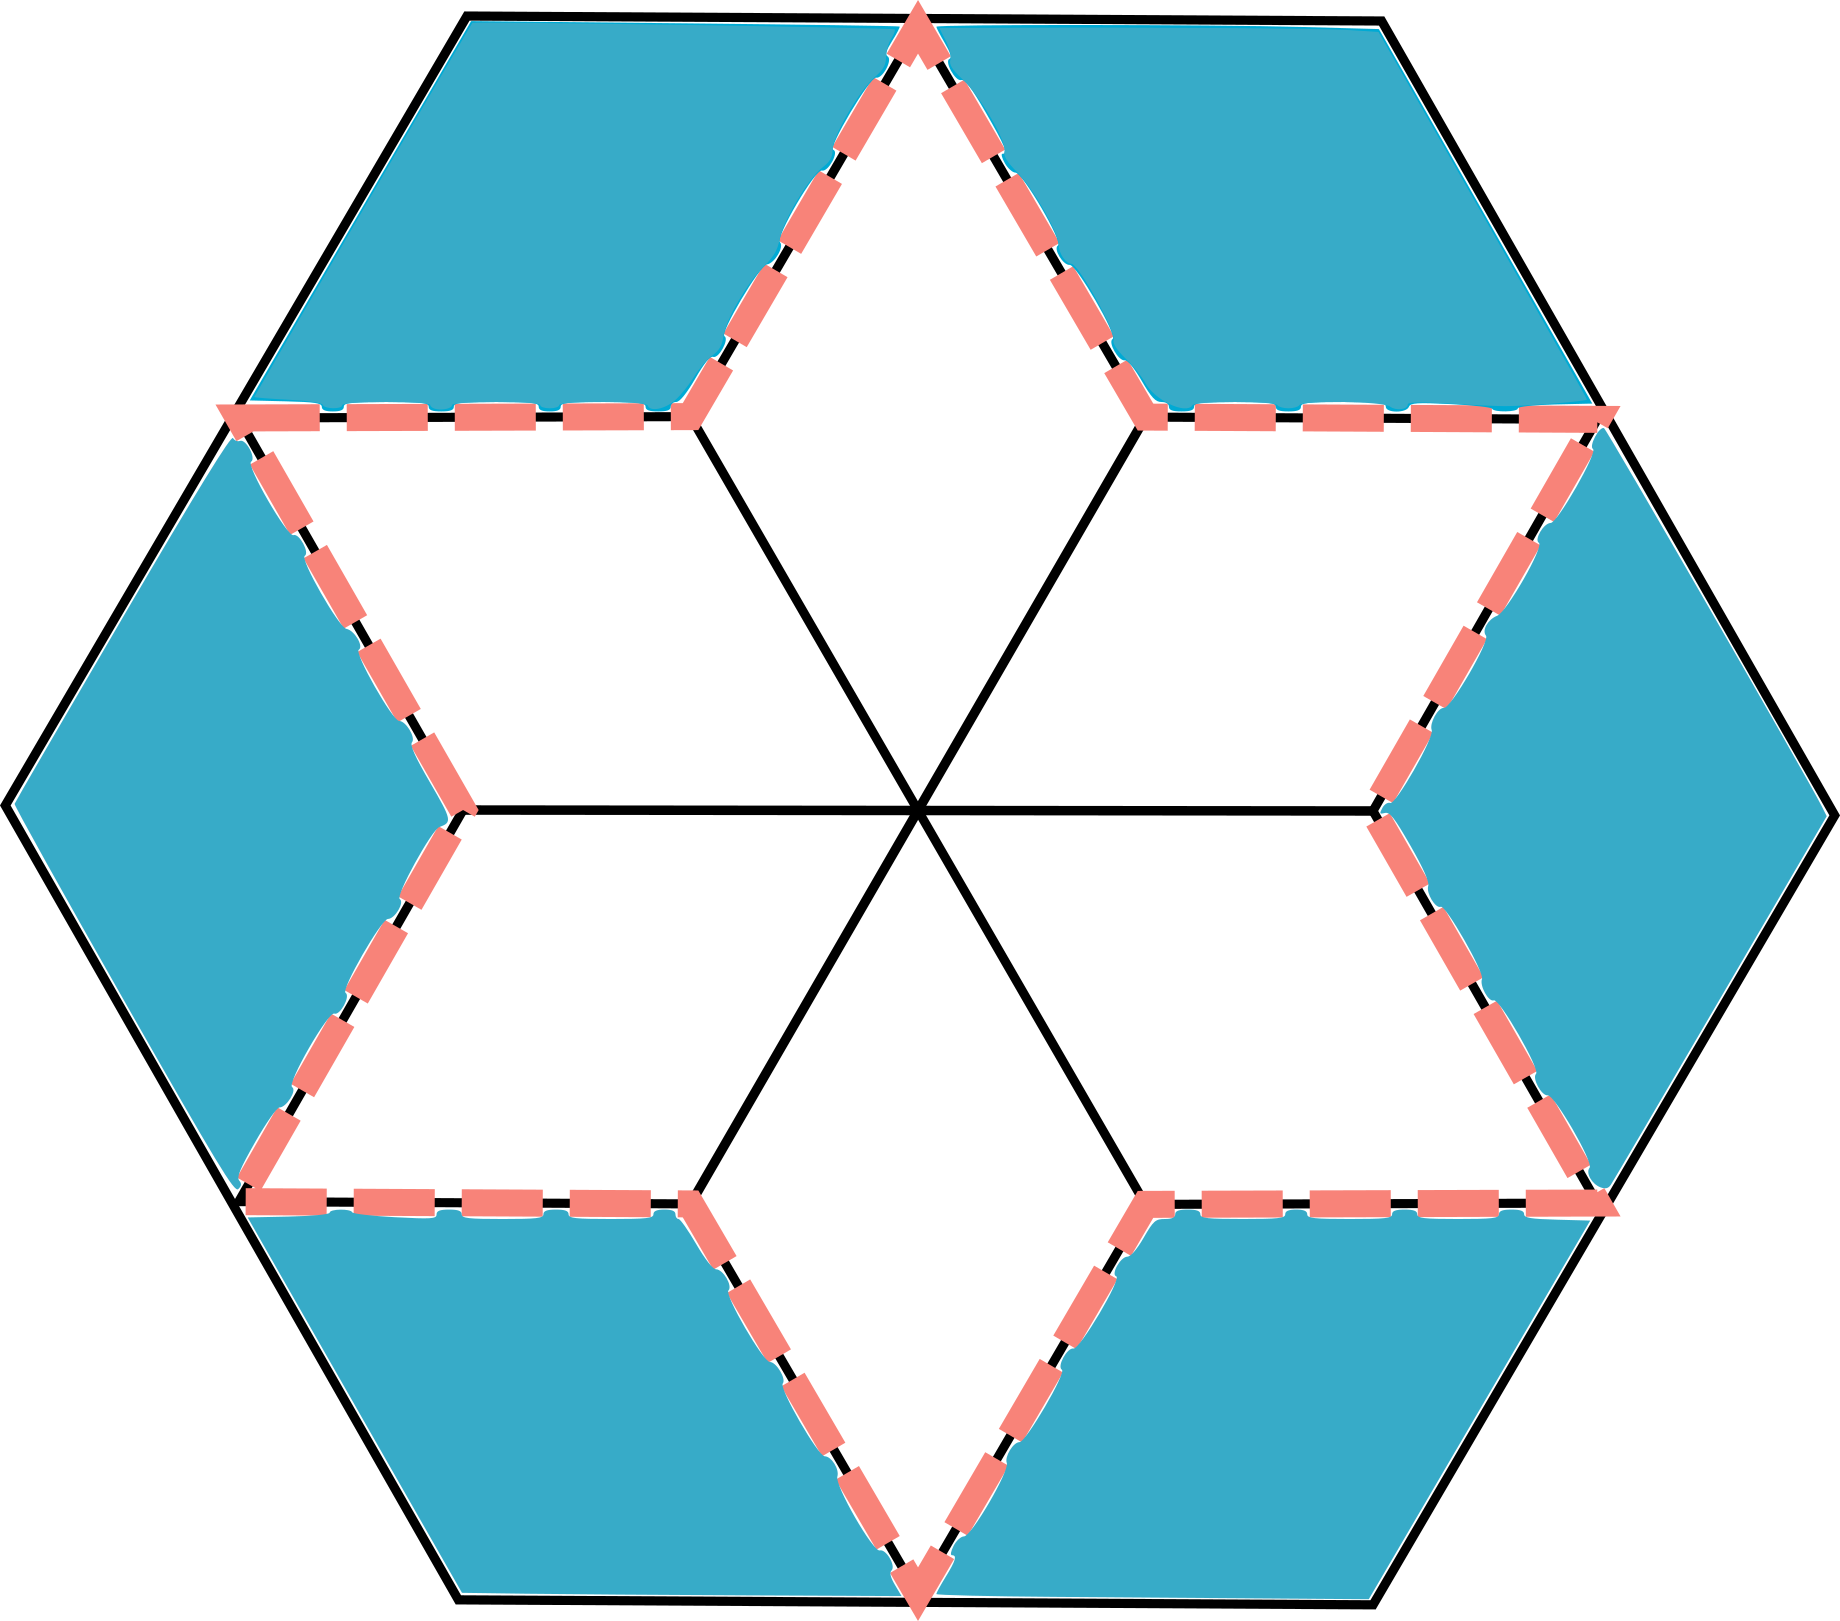
1. Begin by stitching three white 1” diamonds together as shown in the diagram. Repeat 23 more times for a total of (24) half stars.
2. Stitch the half stars together along the center seam as shown in the diagram to create (12) 6-point stars.
3. Add blue 1” diamonds around the perimeter of the 6-point star as shown in the diagram to create the (12) 6-point star hexagons. The outer edge of the hexagon should measure 2” in length when completed.
Piecing the Sections
I chose to work this quilt in three sections to keep things orderly and reduce bulk as the sections grew and came together. As such, you may choose to lay out your quilt at this point before continuing in order to create your desired aesthetic. Alternatively, you could choose to lay out each section as you go. Regardless of your preference, be sure to read the instructions for each section carefully in order to achieve the correct color placement for the overall flag motif.
Pro Tip:
Remove papers from all inner hexagons/blocks after stitching each section to reduce paper usage and save time at the end. Don’t forget to leave the papers in around the perimeter of each section for joining purposes later!
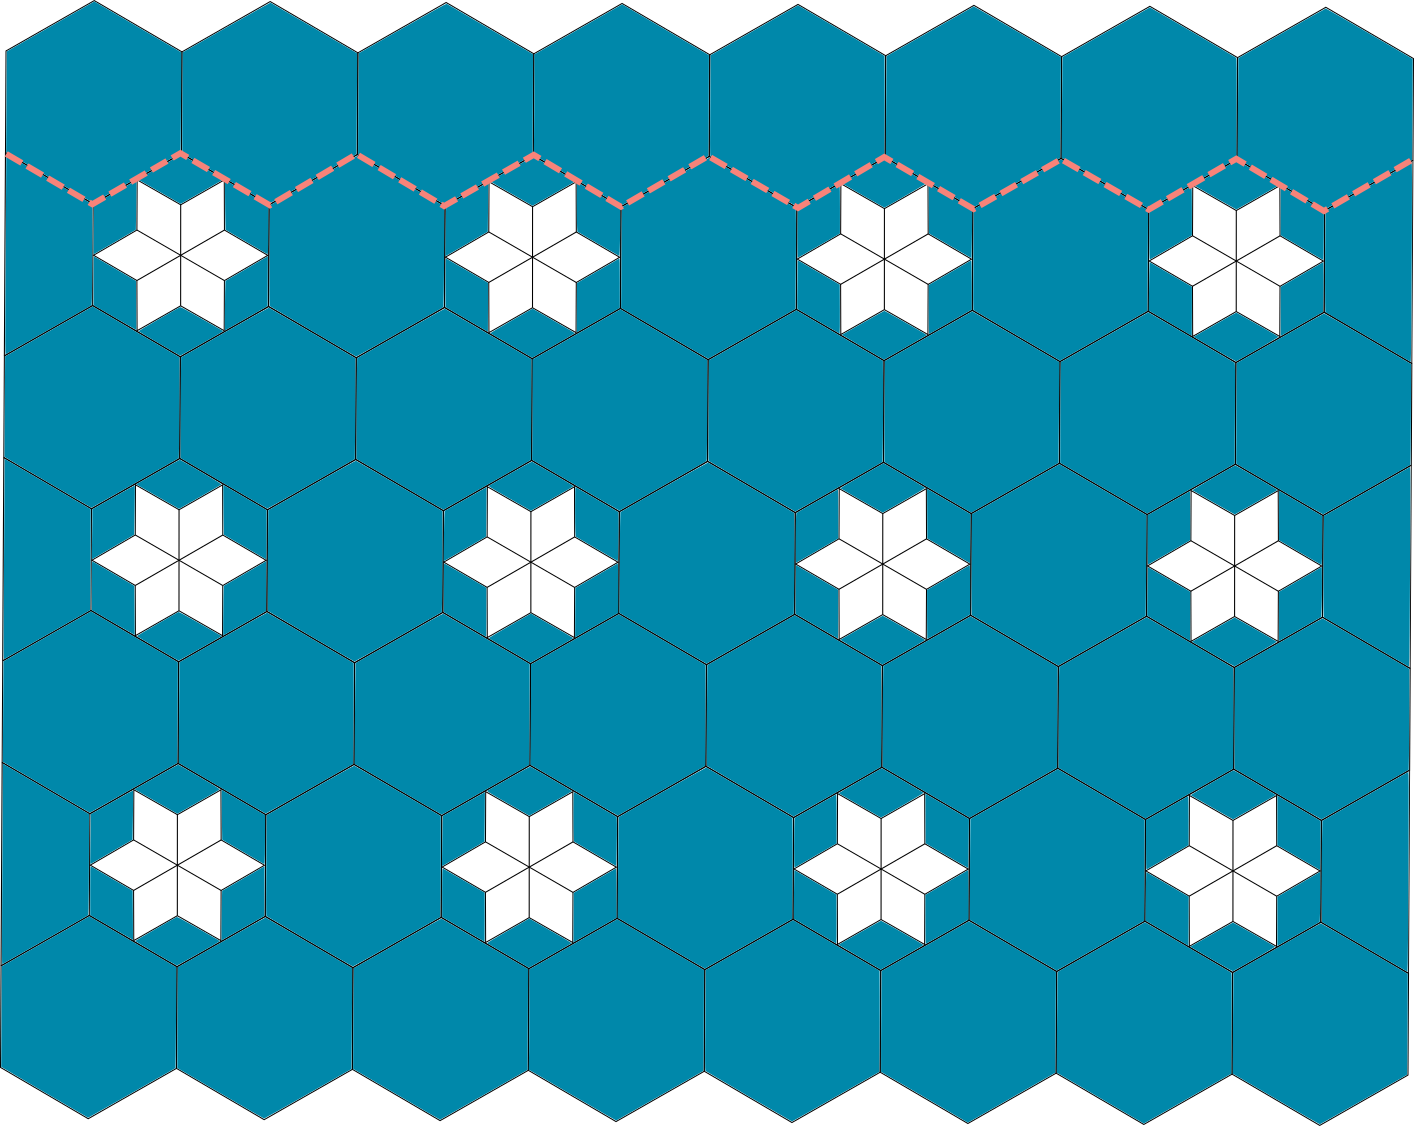
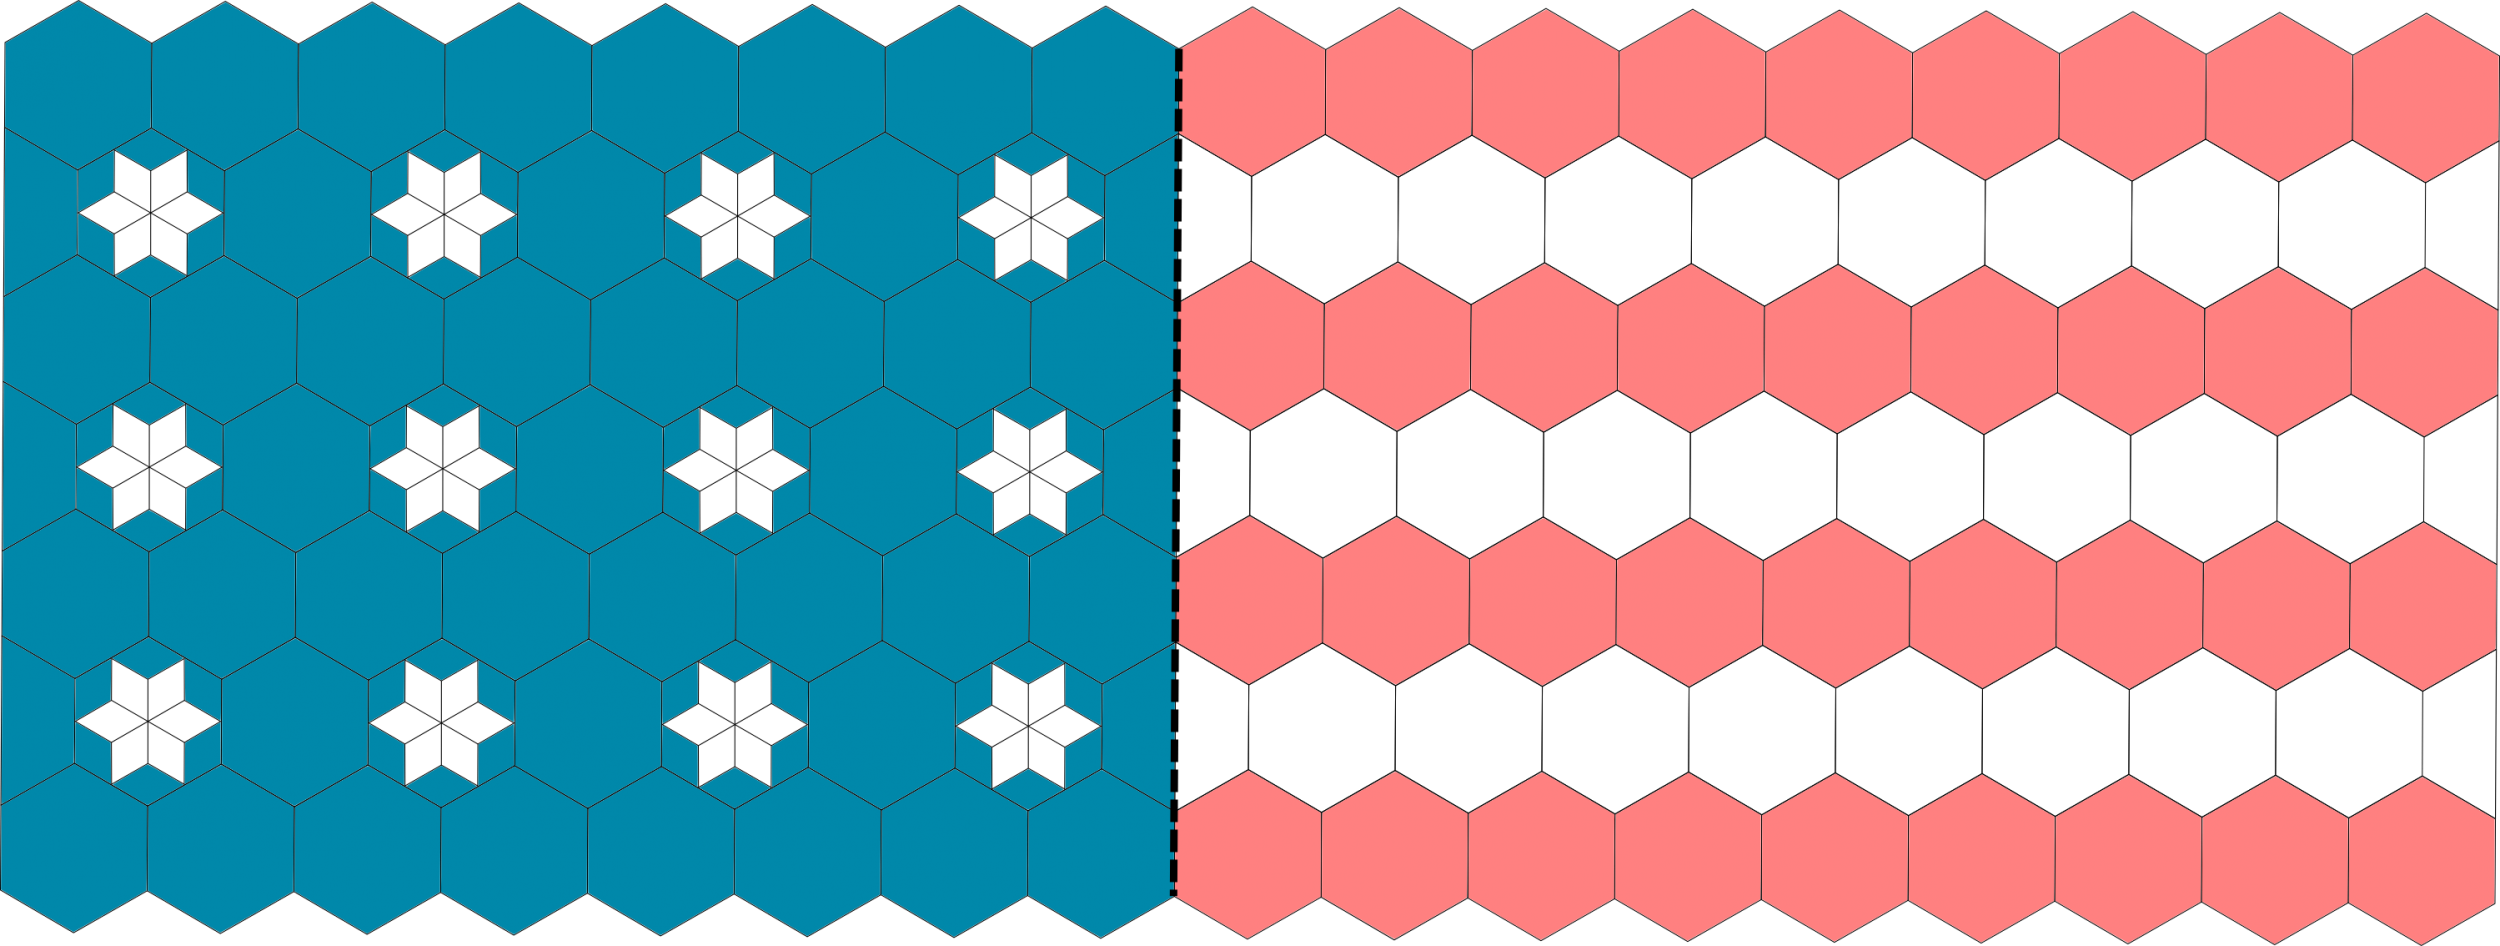
Stitching the Blue Star Section
1. Stitch (8) 2” whole blue hexagons together in a row as shown in the diagram. Repeat an additional 3 times for a total of (4) blue hexagon rows.
(For my favorite way to speed up stitching rows of hexagons, check out this post. It’s EPP hack number 4.)
2. Stitch a star row as shown in the diagram. Be sure to begin and end each row with a blue 2” half hexagon. Repeat an additional 2 times for a total of (3) star rows.
3. Stitch the rows in alternating order beginning with the row of whole hexagons as shown in the diagram. Set aside.
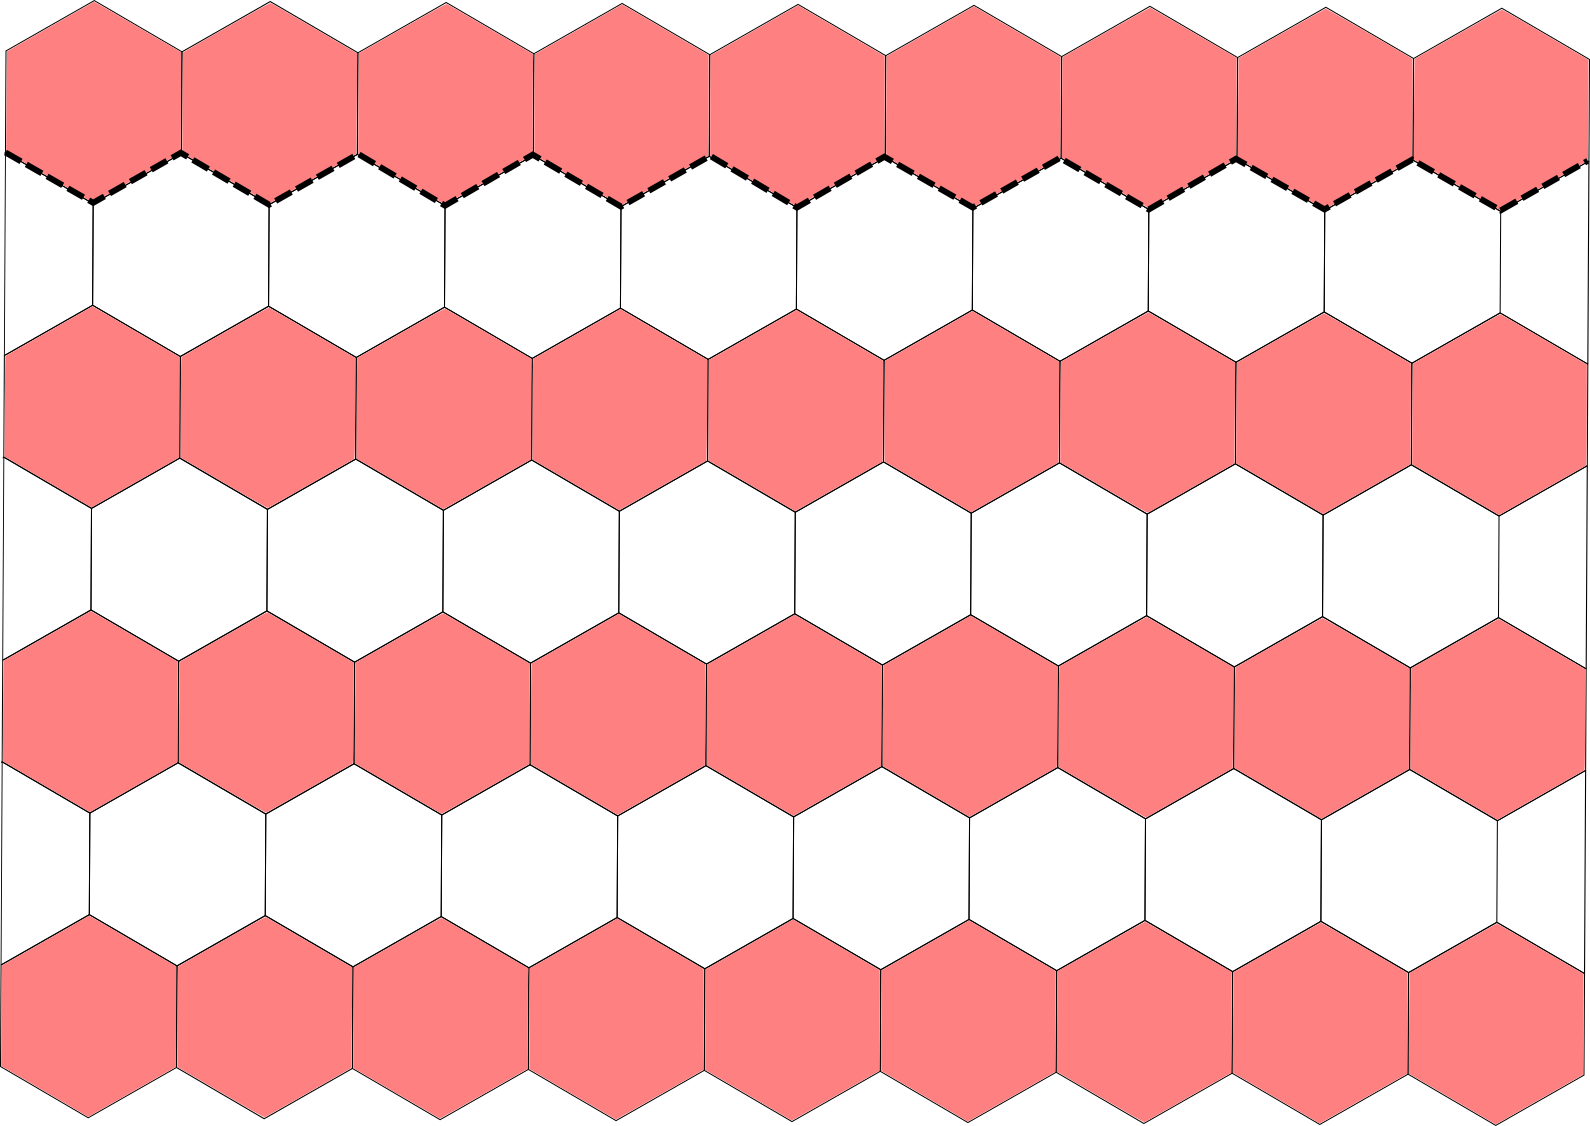
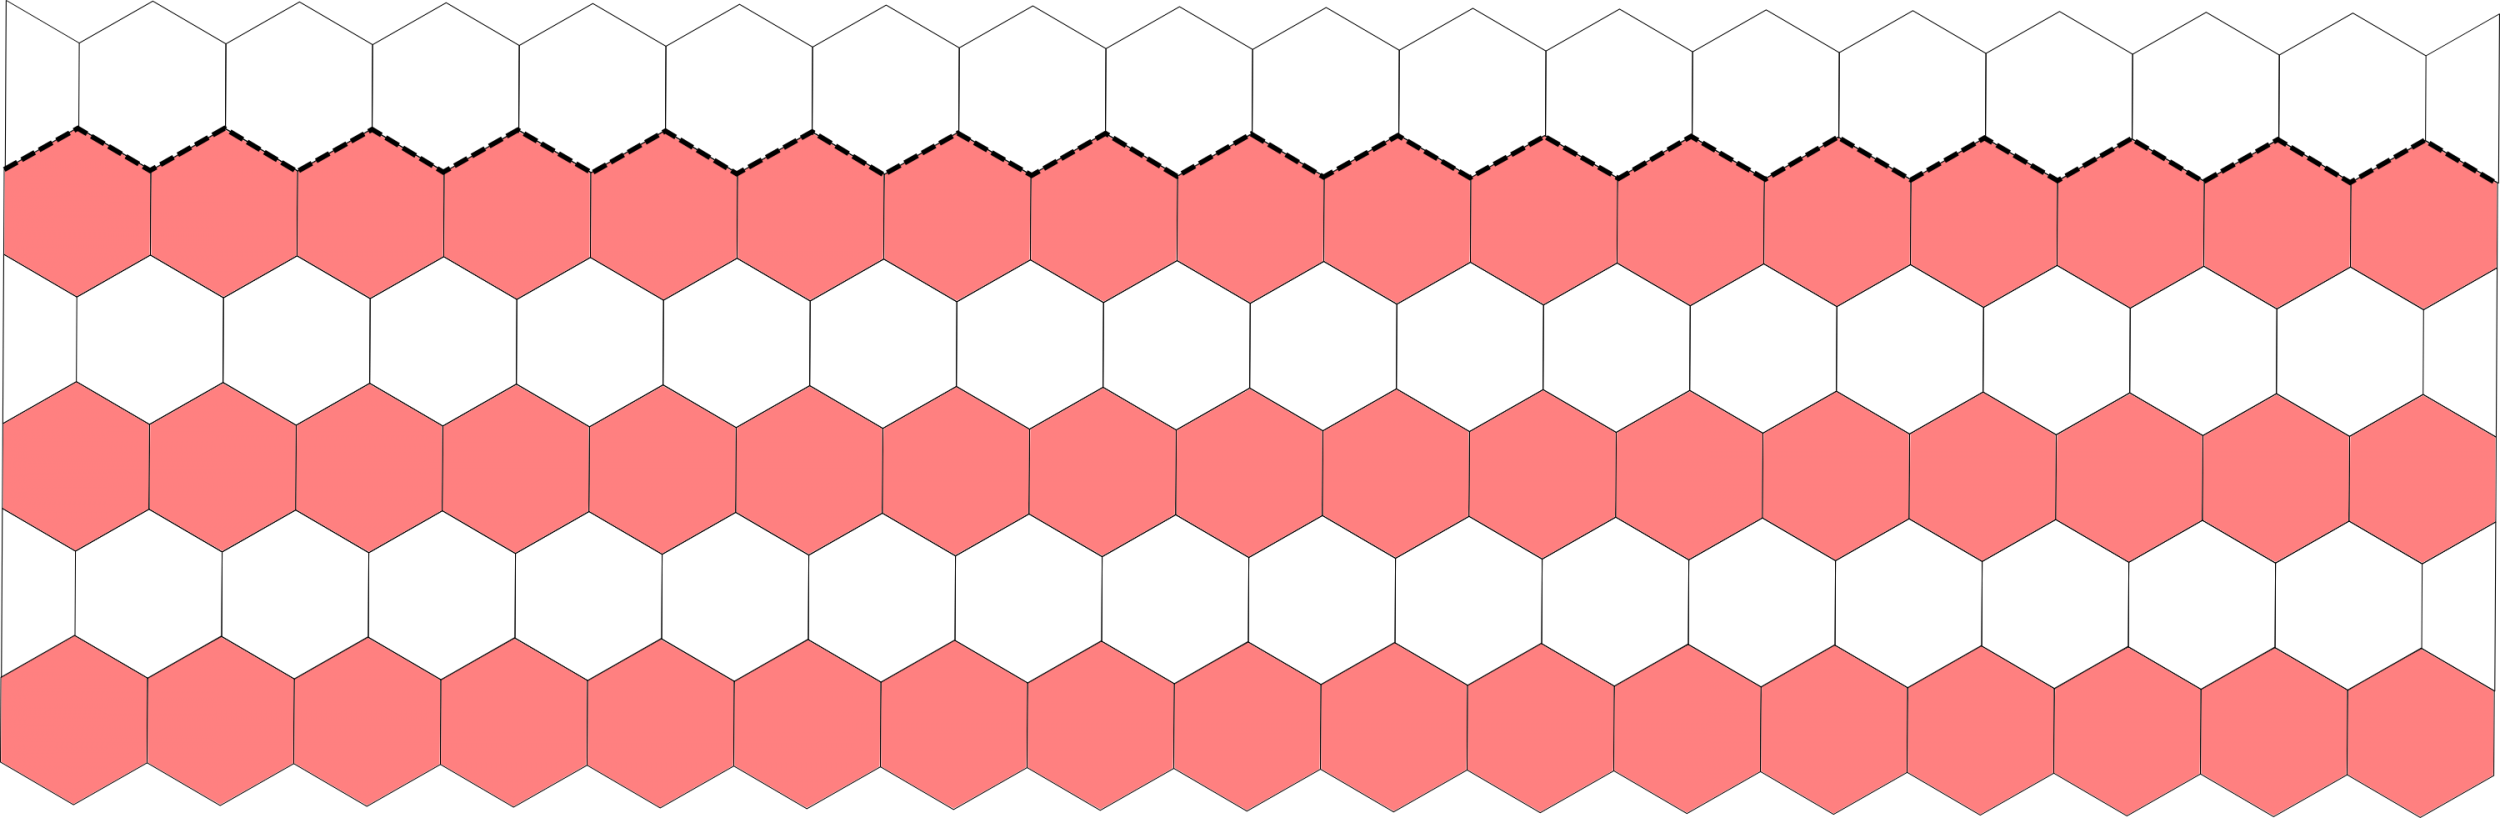
Stitching the Short Striped Section
1. Stitch (9) 2” whole red hexagons together in a row as shown in the diagram. Repeat an additional 3 times for a total of (4) red hexagon rows.
2. Stitch the white rows by beginning and ending with a white 2” half hexagon, and (8) white 2” whole hexagons in between as shown in the diagram. Repeat an additional 2 times for a total of (3) white hexagon rows.
3. Alternate stitching the red and white rows, beginning with a red row, as shown in the diagram. Set aside.
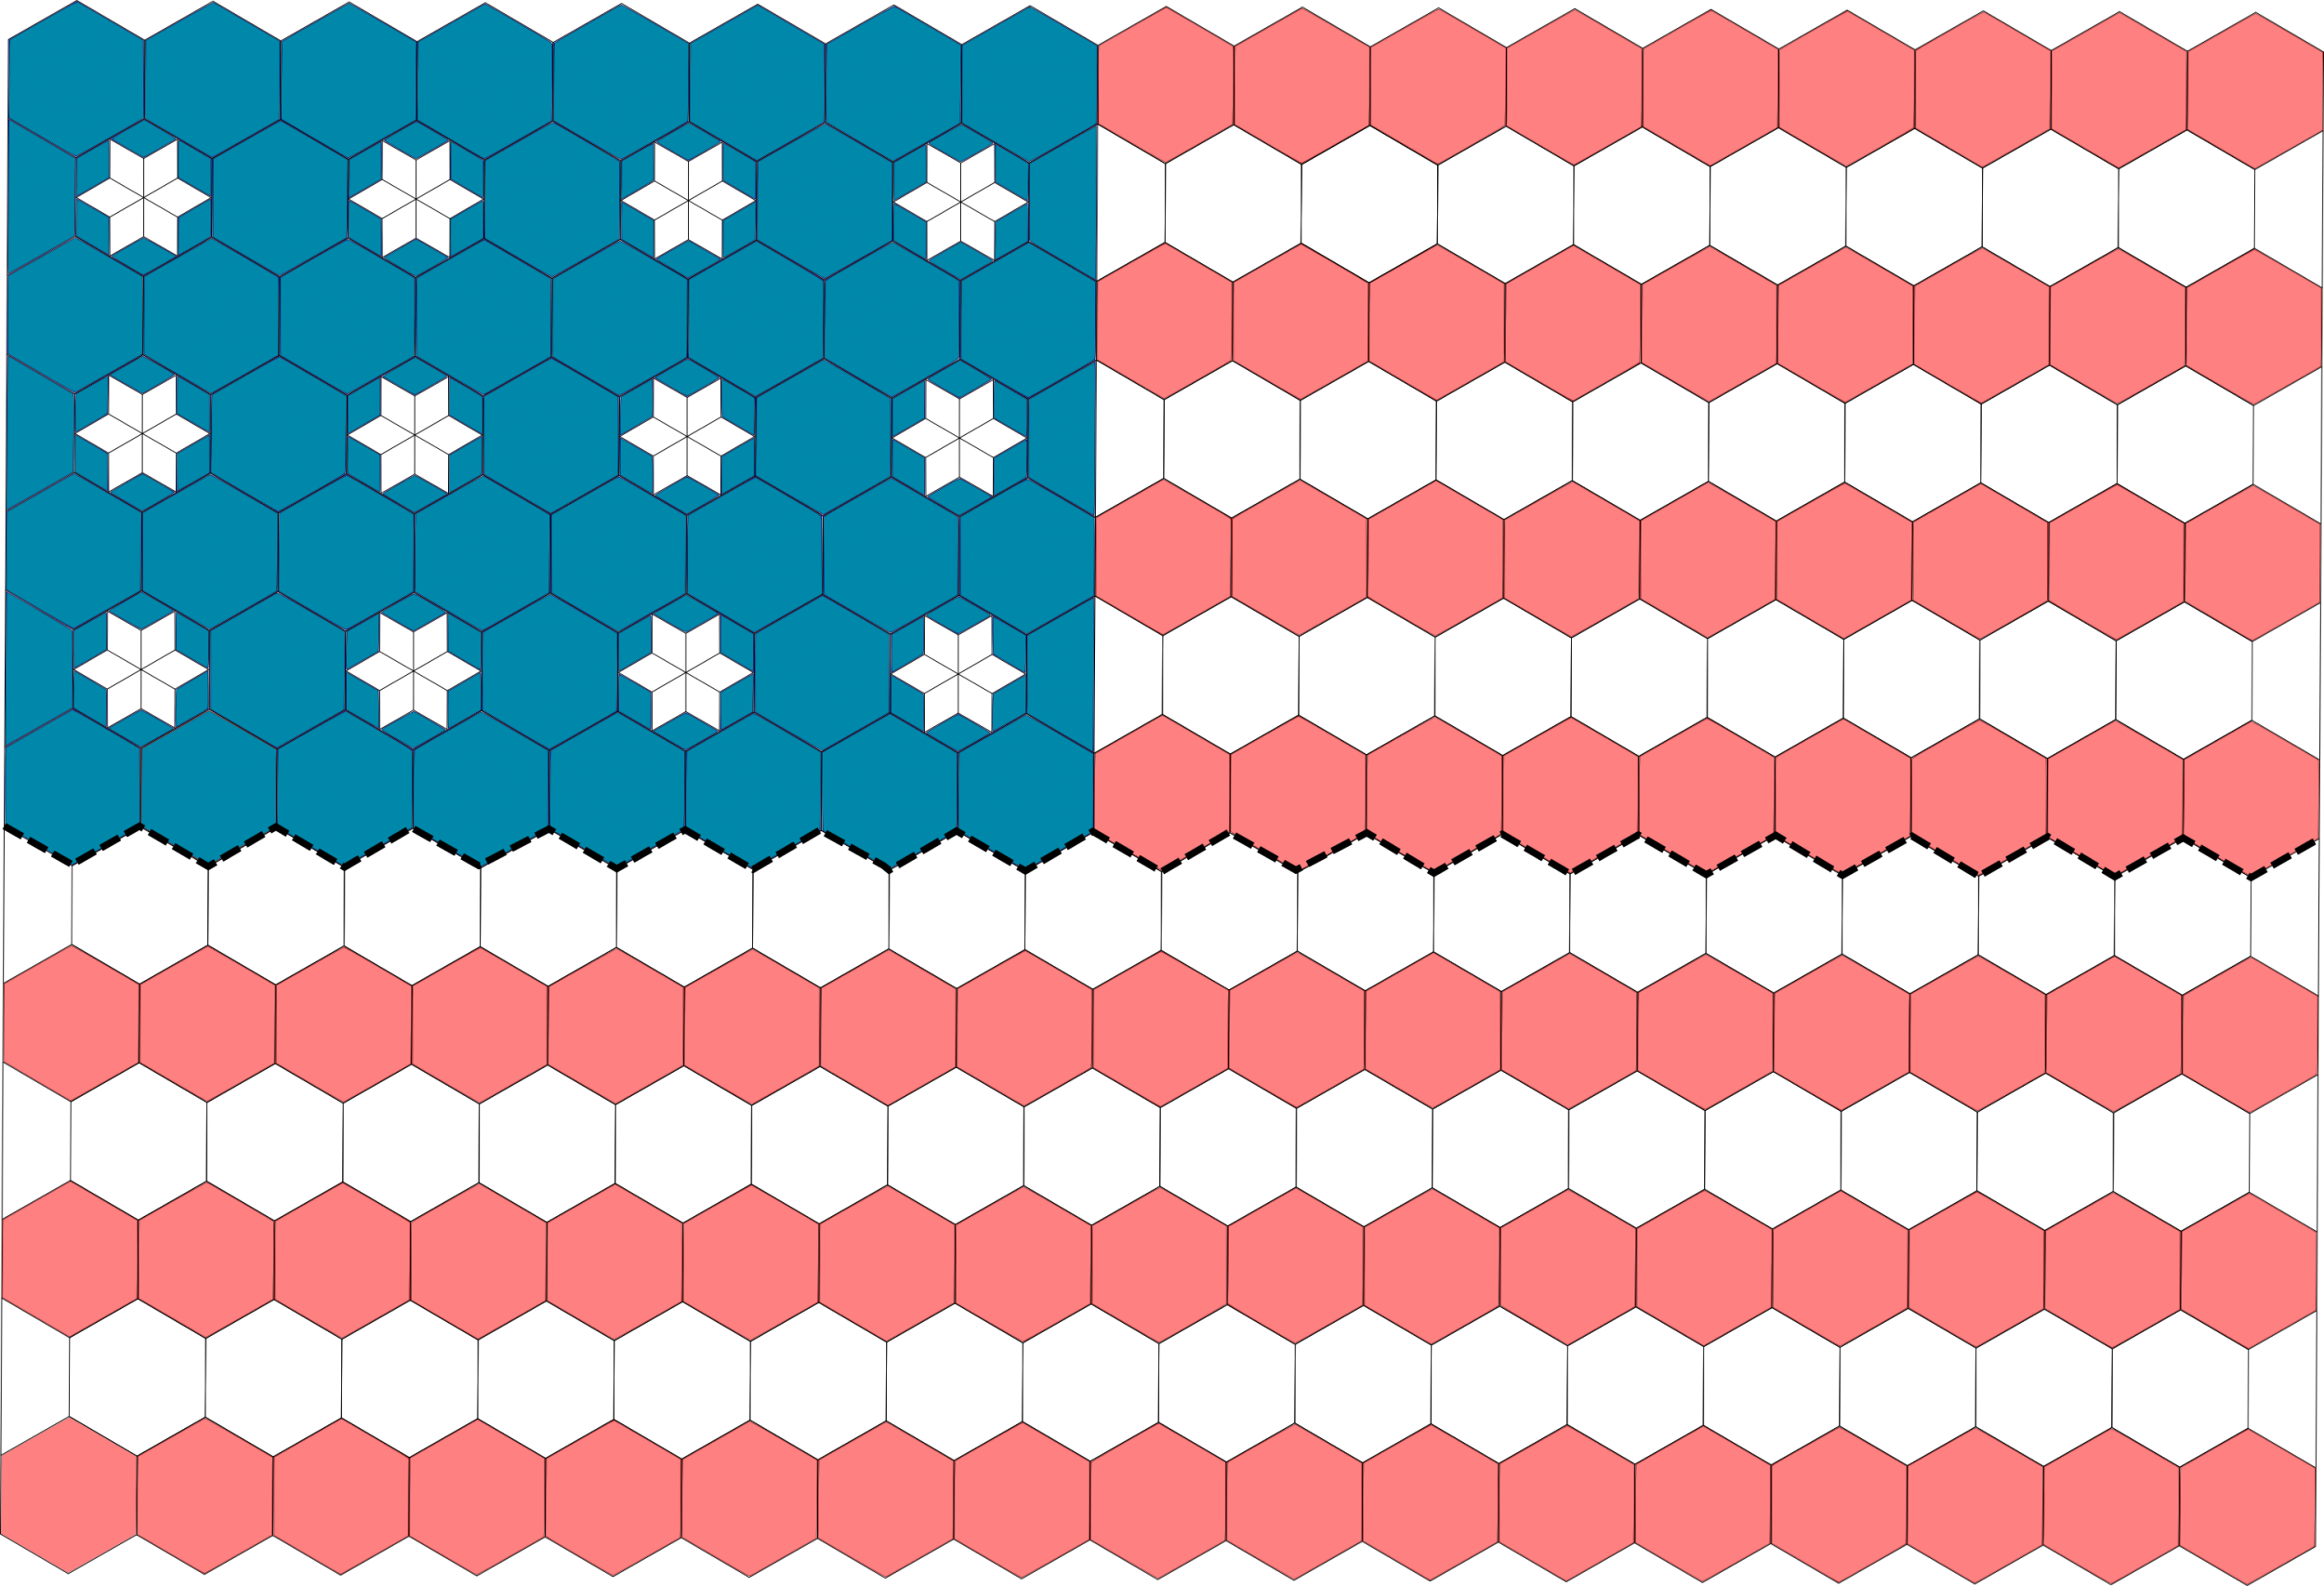
Stitching the Long Striped Section
1. Stitch the white rows by beginning and ending with a white 2” half hexagon, and (16) white 2” whole hexagons in between as shown in the diagram. Repeat an additional 2 times for a total of (3) white hexagon rows.
2. Stitch (17) 2” whole red hexagons together in a row as shown in the diagram. Repeat an additional 2 times for a total of (3) red hexagon rows.
3. Alternate stitching the red and white rows, beginning with a white row, as shown in the diagram. Set aside.
Piecing the Quilt Top
1. Join the blue star section with the short striped section as shown in the diagram.
2. Finally, stitch the two halves of the quilt top together along the central seam, as shown in the diagram.
Finishing
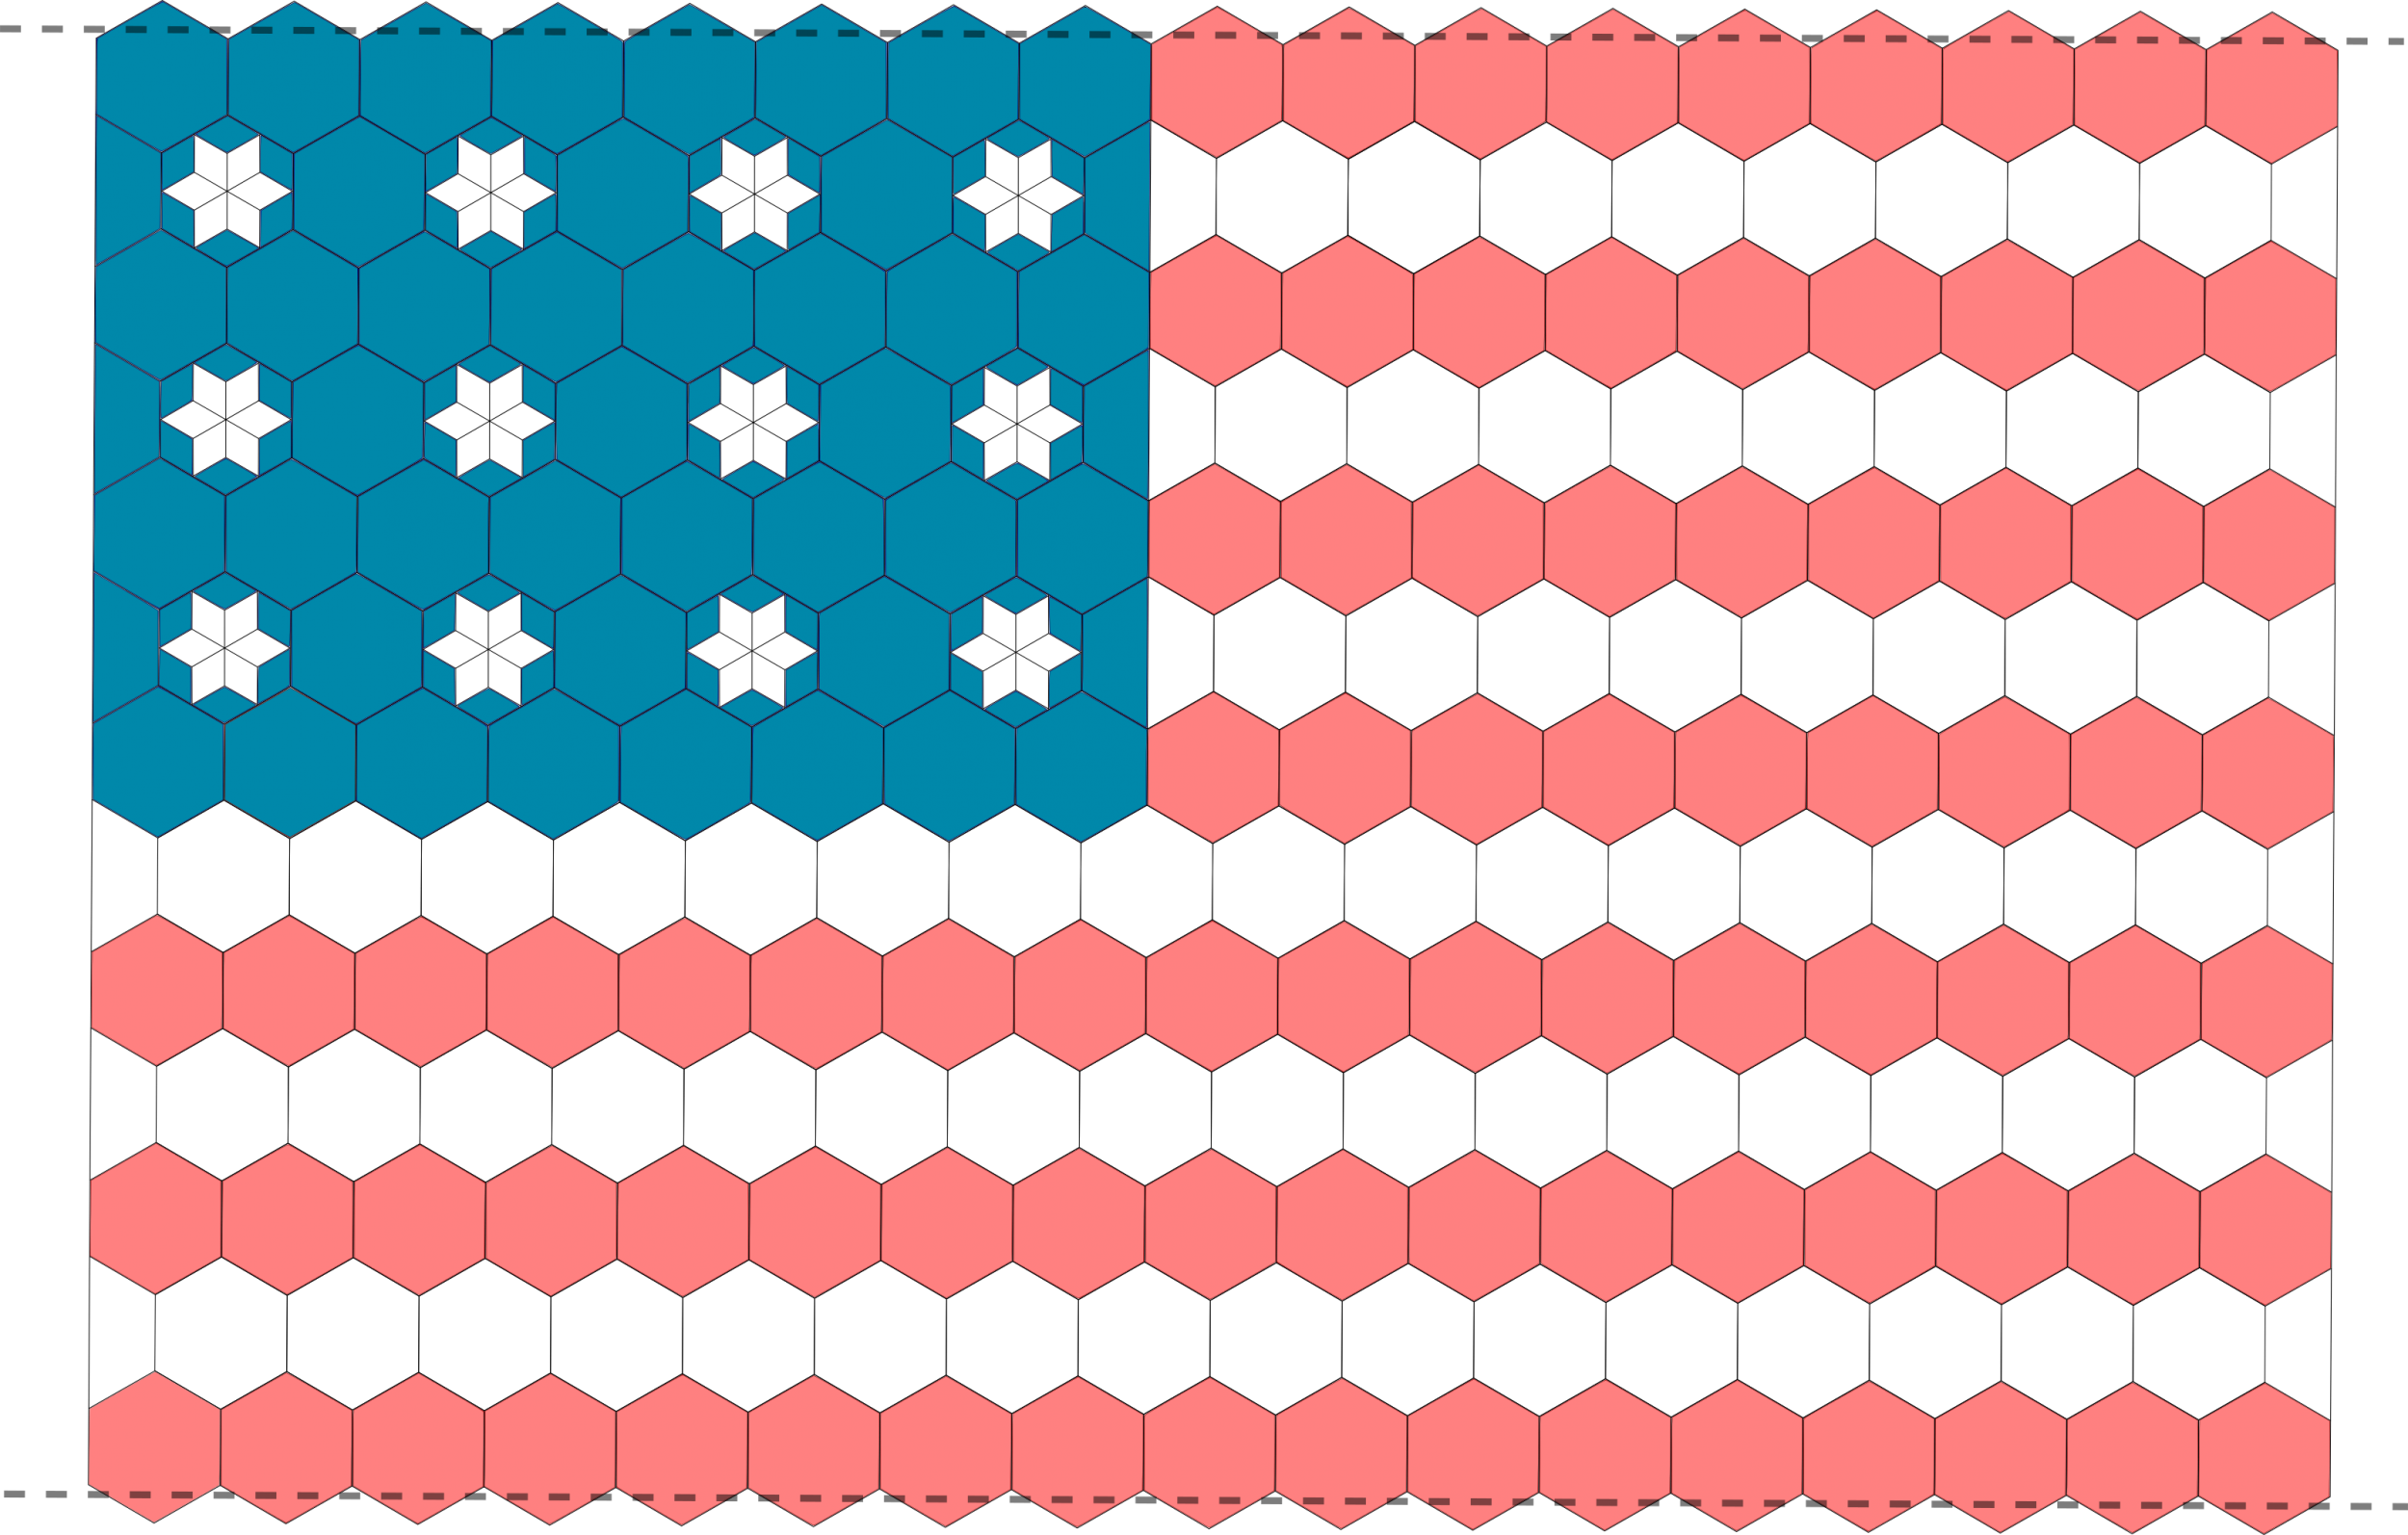
1. Press, remove papers, press again.
2. Trim the top and bottom of quilt top with a 3/8” seam allowance.
3. Baste, quilt, and label* as desired.
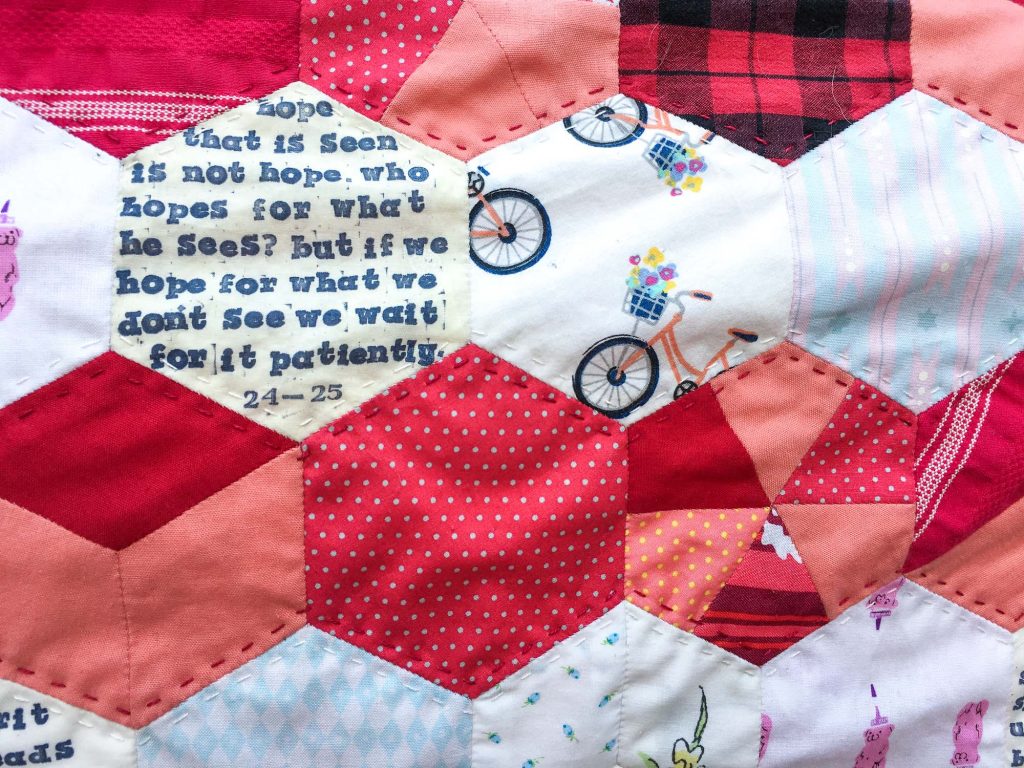
*You may have noticed that I stamped several white hexagons as well as the quilt label on the back. I am a firm believer in giving yourself credit for your quilted works of art, just like artists sign their paintings. For a simple stamped quilt label tutorial click here.
A Few Colorways for Inspiration
This one has an old world, vintage feel.
This one feels vintage, too, but in a softer variation.
You can't go wrong with a classic!
Happy stitching!
Don’t forget that you can always pin this post to Pinterest for easy access later.
This post may contain affiliate links. You can read my affiliate disclosure here.
I just want to thank you for sharing such a beautiful project. I will definitely be tackling this during the new year of 2022.
Thanks again and God Bless
Peggy
Hi Peggy! Thanks so much! Just realized (many months later…) that I’ve had a glitch on comment notifications on my website. I hope you enjoy stitching it, and may God richly bless you as well!
Lisa
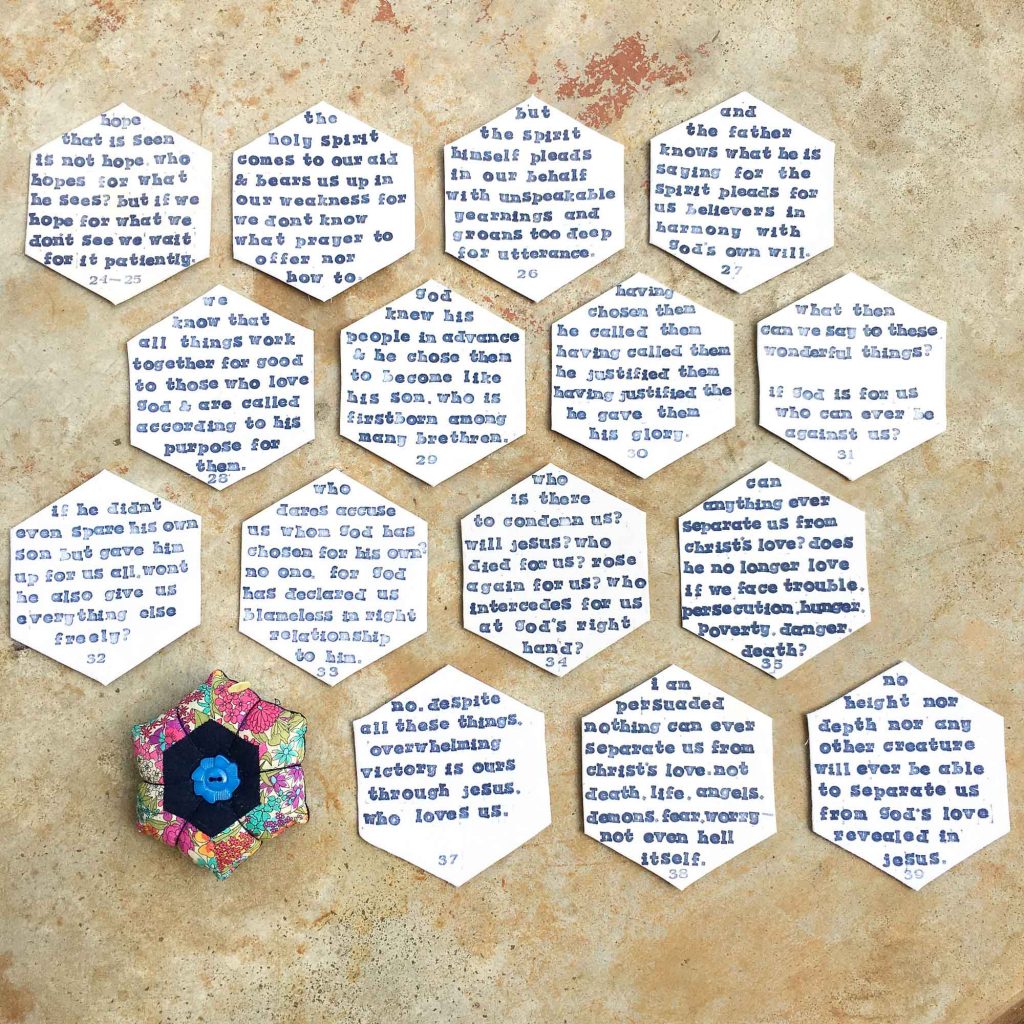
I would love to have a list of the scriptures you used in this quilt. This project has touched my heart. I’m American by choice not by birth, and love the idea of praying for my country in this way
I have a few friends who are American by choice, as well, and love that somewhere along most Americans have a family member that chose to be American. So, welcome to America. 🙂 I love that we can pray for our country, too. These verses are all taken from Romans 8:24-39. I’ve just added a photo to the post showing all of them together so you can read them in the way I adapted them to fit the hexagons but still maintain the spirit of the scripture they represented. I hope that helps and happy stitching!


5 Responses
I just want to thank you for sharing such a beautiful project. I will definitely be tackling this during the new year of 2022.
Thanks again and God Bless
Peggy
Hi Peggy! Thanks so much! Just realized (many months later…) that I’ve had a glitch on comment notifications on my website. I hope you enjoy stitching it, and may God richly bless you as well!
Lisa
I would love to have a list of the scriptures you used in this quilt. This project has touched my heart. I’m American by choice not by birth, and love the idea of praying for my country in this way
Hi Pauline,
I have a few friends who are American by choice, as well, and love that somewhere along most Americans have a family member that chose to be American. So, welcome to America. 🙂 I love that we can pray for our country, too. These verses are all taken from Romans 8:24-39. I’ve just added a photo to the post showing all of them together so you can read them in the way I adapted them to fit the hexagons but still maintain the spirit of the scripture they represented. I hope that helps and happy stitching!
Cheers,
Lisa
Thanks for posting the extra pic